


76
77
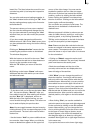
audio sample will be split at this point without
playback being stopped.
If you whish to copy the split audio pieces into
the Storyboard in the Edit screen, you need to
rst activate the "Insert as scenes in storyboard"
by marking the little box.
After splitting the sample and conrming with
"Ok" or waiting until the end of the sound, the
video data will be created.
The sample parts are automatically copied in the
form of empty scenes, containing the respective
parts of the sound. These empty scenes are
placed into the Storyboard in the Edit screen
– they’ll be easy to spot: Black scenes with a
little music note symbol.
Additionally, you can now press the "Replace"
(or "Insert") button (see chapter 5.5, item (16)
/ (12)), so that the selected empty audio scene
takes the place of the selected scene in the
Storyboard. If the video scene is too long, it is
trimmed to the right length at the end.
This function is great for audio pre-editing as
you can comfortably make your cuts and then
implement the rhythmically cut up audio piece
to any video material.
Once you have split your audio sample, the
sample list shows that copies of it have been
made and that your original sample is still avai-
lable.
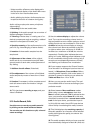
(10) Use the Trim function to remove unwan-
ted components at the beginning or end of the
recorded or split audio material. Coughing in
the commentaries and residual material from
adjacent CD tracks can thus be eliminated. The
Trim function is also familiar to you from video
editing, and functions in the same way with
audio. The wave form and audio scrubbing (see
Chapter 3.2) cannot however be disabled in this
menu.
(11) Click on the Delete button to delete the
selected audio sample.
(12) Click on the Undo button to undo deletion
of an audio sample. The last ten samples dele-
ted can be recovered in this way. Deleted scenes
cannot be reactivated following a restart.
(13) The name of the audio sample clicked on
in the sample list is displayed automatically in
the name eld. The name can be changed in the
manner familiar from video. Click in the name
eld to call up the keyboard. The length of the
audio sample is displayed in the adjacent eld.
(14) Use these buttons to control the Stop/
Record/Play functions for the audio sample
highlighted in colour in the audio list. You can
make corrections to the volume with the aid of
the scrollbar below the volume display (1) whilst
recording is running.
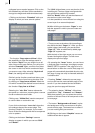
(15) Click on the CD Recording button (only on
models with integral DVD drive)
to the left of Record/Stop/Play to call up the CD
Import. Click on this open symbol,
to open the drive drawer in which you can put
an audio CD. then press the button on the drive
(or press against the drawer) in order to close it
again.
Now click on the Display CD contents button to
read all available tracks on the audio CD inserted
beforehand into the DVD-RW drive. To sample
your tracks, check the box next to Play track in
order to play the audio sample automatically for
approximately 5 seconds as soon as it is selec-
ted in the list. You can switch to a different track
or start import with OK at any time during play.
You have the following possibilities to enter
titles:
• To import only one track at this stage, mark it
in the list and conrm with OK.
After entry the window "CD Import" closes
automatically and you see the title displayed in
the list of sound clips.
• If you would like to read in several titles
present on the CD, then select the rst desired
title and begin reading by clicking on “Import
track”. The window remains open so that you
can then select a further title, click on “Import
track”, etc.
When the audio track has been read in, click
onto "Ok" to enter the Audio Record, Edit menu.
The tracks read in beforehand are now displayed
in the list of audio samples.
• If you would like to read in all the titles on the
CD, then click the button “All”. It is unimportant