


44
45
on "P 1" (or "P 2", etc.). The on-screen keyboard
appears so that you can enter another project
name. The chosen project name is also display-
ed in the edit screen above the scene bin.
Only the currently active project can be edited!
Exchanging video data between different pro-
jects is possible using the Clipboard feature in
the Edit screen. You always have access to archi-
ved titles and colors.
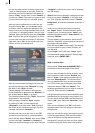
(4) Under "Image size" you have the choice
among Small, Normal, and Large. This setting
applies only when effects are applied.
We recommend using the default setting Nor-
mal. This will usually prevent black margins
from appearing when using effects.
The image size can be changed at anytime in the
current project. It takes effect only when app-
lying effects and titles.
For technically interested users: A video signal
conforming to the studio standard CCIR 601
enables the use of 720 samples and 576 picture
lines. The real resolution is even higher, but a
video picture requires certain portions for syn-
chronization signals, videotext, timecodes, etc.
The resolution of 720 x 576 pixels is the maxi-
mum allowed area for real video information.
But many video sources do not make use of
this resolution. This is true for camcorders,
laserdiscs, and even for studio devices. A much
smaller portion is often used in the assumption
that most televisions will not be able to render
the entire signal.
(5) The "Format" button provides different set-
tings.
In addition to the normal “4:3” formats, the sys-
tem also offers a “16:9 Anamorphic” mode.
The option means the 16:9 mode anamorphic
and contains 576 picture lines.
16:9 is set when starting the project.
This special mode works only if both camcorder
and TV conform to the 16:9 standard.
It might be necessary to manually switch the TV
monitor to 16:9. If the TV is not switched, then
SMART EDIT uses the standard display 4:3.
16:9 display is possible regardless of the format
in which the video source has been recorded.
Note: The 16:9 format is not available for NTSC
machines.
Further, note the formats "4:3 Progressive" and
"16:9 Progressive". Cameras which support the
"Progressive" function only work with 25 frames
(NTSC: 30) instead of 50 elds (NTSC: 60) per
second. If you activate one of the Progressive
formats, a warning is displayed saying that you
should only use this setting in combination with
a Progressive Scan camera. Otherwise you could
limit the effect use.
If you have chosen a progressive format for your
project, you can proceed to trim, split, etc., with
a progressive (full frame) display.
Furthermore, you can use the "HDV" format,
which is of course ideal for HDV video footage
recorded with such a camcorder.
If you choose to work on an HDV project, once
you have started editing, it is not possible to
revert back to another format for that project.
If you decide to work on a 4:3 or 16:9 project,
once started, it is not possible to select a the
HDV format any longer.
(6) The eld "Audio settings" refers to the menu
“Mix” and consists of two parts:
In the upper area you can specify whether the
“Transitions” for the inserted transition effects
should be “constant” or “lowered”.
A continuous (linear) audio fade means that the
audio of both scenes is faded in and out without
reducing the volume. This function should be
used, for example, when both scenes have
similar volume.
A lowered (logarithmic) audio fade means that
for monotone background audio in both scenes
(e.g. sea shore, trafc) the impression is that the
rst scene audio is quietly faded out before the
second scene audio is faded in with increasing
volume.
A continuous fade can sometimes have the
disadvantage that between different soundtracks
“acoustic confusion” can arise. Depending on
the audio of the scenes in question, it will be
advantageous to use either the constant or the
lowered method.
Note: If you have selected the audio fade after
the fact, transitions will not automatically be
newly calculated. But you can change each
individual transition afterward in the menu
“Mix”. There you activate the left scene and
the corresponding sound clip. Then click on the
button “Fade” and in the window then displayed
under “Transition” set the desired option
(“constant” or “lowered”).
In the lower area of the window you can specify
the behavior of the scene soundtracks.