


80
81
(7) Hit the Remove button to delete the active
audio sample. This function has no effect upon
the original track, as only audio samples from
the supplementary tracks can be deleted. Re-
member that removing a audio sample may
necessitate recreation.
(8) Clicking on "Replace" opens the list of sound
clips and you can select a clip that now replaces
the previously active clip on the soundtrack.
(9) The Range function is used for adjusting the
position and the IN and OUT points of a audio
sample. The Range button can be selected when
an audio sample is clicked upon and thus acti-
vated. A Trim menu is called up similar to that
for the trimming of video scenes. Once you have
selected Position, you can move the entire audio
sample with the aid of the Start button. Should
the audio sample be too long, you can also
shorten it at the beginning and end. Select the
Trim function and then the IN and OUT buttons
in this case. The sound characteristic is display-
ed by the wave form (Chapter 3.3). Play back
again to check any changes. The new position is
also shown graphically when you return to the
Audio-Mix menu.
(10) SMART EDIT is able to play back several
audio tracks simultaneously only if they have
rst been created (if necessary by clicking on
Create). Portions which have not been created
are displayed by yellow regions in the colour
control bar at the top. The entire audio visible in
the active image size is generally created toge-
ther with the active audio sample (highlighted
in blue), even if it lies outside the window. If the
entire storyboard is to be created, launch creati-
on from the Finish menu.
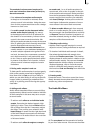
(11) Click on the Timeline button to call up a new
window in which the active audio sample is dis-
played in full and which shows the other samples
in relation to it. The active audio sample thus
serves as the dimension for the full width of the
new window. This permits a larger (full-screen)
display of very short audio samples (which would
otherwise appear only as a narrow line in the
storyboard), whereas the full length of very long
audio samples (which would otherwise run over
the limits of the visible region in the storyboard)
is displayed with all audio samples of adjacent
sound tracks. The timeline thus offers a scaled
view by which, for example, the volume characte-
ristic or any fades can be viewed more easily.
This window displaying the time data serves
mainly to provide a better overview. You can
however also use it to move the displayed part
below the timeline display with the aid of the
scrollbar, to change the sound track to a diffe-
rent audio sample by clicking on it, and to call
up the functions Fade and Envelop from the
timeline display.
The symbols >> and << indicate that the audio
sample does not end at the edge of the timeline,
but continues.
The original sound track is displayed twice, one
display above the other. The reason is as follows:
if for example you have inserted a transition
effect, two audio samples overlap. In the timeline
display, these two audio samples are then display-
ed in two lines (in both original sound tracks).
(12) Click on the Fade button to call up a dialog in
which you can adjust fade-in and fade-out of the
currently active audio sample. The audio volu-
me is consequently reduced or increased for the
selected duration (which of course cannot exceed
the length of the audio sample), reaching the
selected baseline volume at the end of fading.
You also will nd the control "Audio Settings" in
“Project Settings”, with which you can specify
whether the audio fade should be “constant” or
“lowered”.
Certain practical time values for fading in and
out are already provided as defaults. Should you
therefore wish to fade a commentary in softly,
you can for example select a fade-in time of 1
second (1 s), and thereby prevent the sound
from being clipped.
Should you wish to fade out an audio sample,
the volume is gently reduced towards the end of
the sample and is completely silent at the end of
fading.
The fade-in and fade-out times act upon all
selected changes, i.e. including any changes to
volume of the adjacent tracks. For example, as
the commentary volume is being increased, the
background music is gently reduced to the selec-
ted value.
The volume characteristic is displayed clearly in
the audio samples.