


26
27
Now click on the button below the scene to call
up the keyboard.
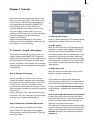
Each scene can now be viewed or edited from
this menu as soon as it has been brought to
the middle of the Scene bin. Once there it is the
selected scene, and it is slightly larger than the
other scenes in the Scene Bin.
Click on the play symbol (next to the slider) to
begin playing the video. Playback can be halted
at any time with the stop button, pause button,
or with the right trackball button.
Your video is now played from the hard drive.
(This lets you know that the footage has been
properly digitized.) If video and audio are suc-
cessfully played, then you know that the instal-
lation was successful, the cables are correctly
connected and the hard drive is communicating
properly.
Your recorded scenes will probably consist of
several different camera perspectives. In order
to be able to separately edit and arrange them,
they must rst be divided up into individual
scenes.
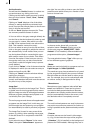
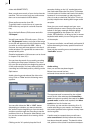
Click on the menu item "Split" in the bottom line
of the Scene Bin menu. The rst frame of the
selected scene (in the center of the Scene Bin)
appears with the Split menu, which is displayed
in the lower third of the picture. The top line of
this menu displays the name of the scene (e.g.
"vacation"). Next to that you see a time indica-
ting the length of the selected splitting position
(initially 000.00:01).
Here you must nd the exact positions where
one shot ends and another begins – the so-
called scene changes. Press the "Split position"
button to obtain a new, narrower control panel.
Now you can scroll through the scene. Look for
the rst perspective change and scroll slowly to
the desired split position. Conrm this position
by clicking the left trackball button, which causes
the selection menu to be displayed again. There
you can adjust the split position by using the"<"
and ">" keys to move forward or backward one
frame at a time.
To check that you have correctly selected the
split position, set the Split position at the last
frame of the rst take. Clicking on the ">" key
will display the rst frame of the next take, cli-
cking on "<" will display the previous one. After
you have done this, you can play the selected
portion (by clicking on the play button).
If you want to keep this scene, select "Use". If
you do not plan to use the selected portion of
video, click "Drop". If you have decided to use
part of the scene, the rest of the scene is given
a name with an additional sufx, (e.g. "vacati-
on.1", "vacation.2", etc.).
After you have completed this step, you still
have the rest of the non-edited raw footage.
Continue as above until you have Used or Drop-
ped the rest of the footage.
Now you can return to the Edit menu (click on
right button).
All takes marked as used are now displayed as
individual scenes ("vacation.1", "vacation.2" etc).
These split copies require no additional space
on the hard drive. The original scene ("vacation")
is still present.
You can now play the individual scenes. Sim-
ply click on the scene. The scene will move to
the center of the scene bin and then becomes
the selected scene. The duration of the selec-
ted scene is displayed above it. If you want to
play the selected scene simply click on the Play
button.
Tip: At this point, if you select the original scene
"vacation” in the scene bin and click "Delete”,
you will regain space on the hard drive – equiva-
lent to the amount of footage that was dropped
when the scene was split up into pieces. This
footage cannot be recovered, so only do this if
you need additional drive space. However, if all
of the footage was used, then deleting the origi-
nal scene "vacation” will have no benet.
Trimming scenes
Now that the raw footage has been divided up
into scenes, we can begin to trim them. Trim-
ming means that the beginning of the scene
can be advanced or the end of the scene can be
shortened. The result should be a scene with
proper In/Out points that make the scene start
and stop when you choose.
Clicking on "Trim" calls up the corresponding