


56
57
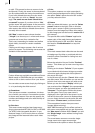
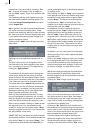
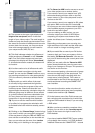
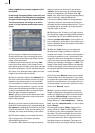
(1) The counter at the upper right displays the
length of the storyboard, which is the total
length of your video project. The total length in-
cludes not only the scenes you have taken from
the scene bin but also all additions such as color
scenes, black intro scenes, etc. You now know
how much storage capacity you will need for
your output media (VHS, DV, etc.).
(2) This eld indicates whether the effects and
audio samples are "Created" or still "Unrende-
red". Even if all effects except one have been
calculated, the display will show "Unrendered".
If all effects have been created, this button will
be inactive.
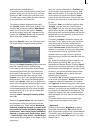
(3) It is often easier to let all effects and audio
mixing be created overnight or during work
breaks. You can use the "Create" button to carry
out pending calculations in order automatically.
(This is commonly referred to as Batch-Rende-
ring.)
A display tells you which effect of the total
is currently being created and the light-blue
progress bar shows the progress of the entire
creation process. Please note that this is an
approximation because the calculation times for
different effects may be different. Some effects
(e.g. the 3D effects) need more calculation time
for every frame and this may lead to a certain
imprecision in the remaining time displayed.
Tip: If you turn off the machine while creation
of an effect is in progress, the calculation will
be nished before the machine actually powers
down.
(4) Clicking on the "Choose Range" button brings
up a menu in which you can specify a segment
of the storyboard (using the "IN" and "OUT" but-
tons and the arrow buttons) to be recorded out.
Here you can also use the wave form (section
3.2) to help you in deciding on the segment.
(5) The Record to VCR function serves to record
your video project out to another device.
If you want to record your material on a VCR,
then select Analog and then click on the Play
button next to it. Your video plays and is recor-
ded out to the VCR.
If you want to record your material to DV, select
the option "DV" and use the DV Controls (6).
Of course you can record video material with the
aid of suitable capture programs to your PC’s
hard-drive and edit it there.
If you are editing an HDV project, you can
now also output your video in HDV. Before
outputting, the system must however rst
render the effects (even if already rendered in
DV).
Depending on the system you are using, the
high resolution of the video and the sheer data
size can result in a longer rendering period.
(6) If you would like to control your DV device
(camera, deck, etc.) from your system, click on
the button "DV Recorder Controls". You can con-
trol your DV device using the control panel now
displayed.
When you are ready click the "Record to VCR"
button located below the control to start recor-
ding of your footage on DV tape. This process is
not shown on the monitor.
We recommend putting a few seconds of empty
scene at the beginning of the storyboard. The
recorder can then begin recording while the
empty scene is being played. This is also re-
commended for the end of the storyboard – this
avoids accidental recording the SMART EDIT
user interface.
The record-out function works only when all
effects and audio tracks have been completely
created (also read item (3): "Create").
(7) In the bottom area of the Finish screen you
see a window with a selection list in which the
program DVD Arabesk is listed, if you are using
a DVD writer.
(8) After you have created the complete video
project, you can click on the "Launch program"
button in the area to the right in order to run
DVD-Arabesk.
If you have installed SMART EDIT as an update,
you probably have version 1 of "DVD-Arabesk"
installed. Please see the "SMART EDIT – second