


80
81
to move very quickly through the storyboard
scene by scene.
Use the arrow buttons to click either through
the video scene by scene, or from one audio
sample to another when there are several audio
samples below a single video scene. The audio
samples of the currently activated sound track
are selected in this case. This function is very
helpful when a large number of audio samples
are located below a single video scene, as the
samples are displayed only very briey during
normal playback.
Select the desired sound track either directly or
by clicking on the corresponding symbol on the
right-hand side of the screen.
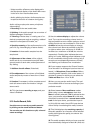
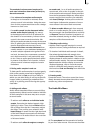
(2) This colour control bar directly beneath the
storyboard shows the range of the original video
scenes in which the audio has not been created
(yellow) or has already been completely created
(blue). Over-modulation is indicated in red.
(3) Select a button with the fx symbol to the
left of the sound tracks to add an effect for the
complete sound track. Effect selection in the
Audio-Mix menu is described under Point (13)
Effects. A further point in the associated button
indicates the presence of an effect in the sound
track concerned.
(4) Click on the Record button to play the sto-
ryboard (from the current scene onwards).
Simultaneous recording is possible through the
selected audio input. For instance, if you have
selected the microphone input, you can record
a commentary for your video. During audio
recording, a volume level indicator is overlaid
over your video material at the lower edge of
the screen. The recorded commentary is subse-
quently added automatically to the sample list.
If the commentary track is active and provides
sufcient capacity for the audio sample, it is au-
tomatically placed in the commentary track.
(5) Click on the Play button next to the scroll-
bar of the storyboard to play from the scene
currently located in the centre of the video. The
other simultaneous tracks are played provided
they have been created. Should the other tracks
not have been created, only the currently selec-
ted track is played back. This saves you from
having to repeatedly create tracks, for example
when you wish only to check the position of the
commentary. Video is generally played at the
same time. During play, a volume level indicator
is displayed, showing any over-modulation. The
volume level indicator has a peak-level indicator,
i.e. the maximum level is displayed continuously
until it is exceeded once again.
By contrast, the Play switch at the bottom of the
screen plays back the current active audio samp-
le. Only audio is played back here, of course
there is no video here. Here too, a volume level
indicator is displayed, indicating any over-modu-
lation.
The name of the sample to be played back
appears on the left of the Play symbol and the
counter. Click on Stop or the right-hand trackball
button to stop play.
(6) Click on the Add button to call up a dialog
showing the list of audio samples. Select the au-
dio sample of your choice here, either directly or
with the aid of the slider with which you are al-
ready familiar. The audio samples already added
are marked with a point next to the length. Bene-
ath the audio samples is a Play button which you
can use to listen to the selected audio sample
again in order to check it before adding it.
Conrm with OK to close the Add dialog. The
selected audio sample is added to the active
sound track.
The audio sample is placed by default in the sto-
ryboard at the very beginning of the active scene
(the scene in the frame). Use the Range button
to move it again (see Point (9)).
Should an audio sample already be present at
the current point in the selected sound track,
the Add function inserts the sample after the
material which is already present. Should there
be insufcient space, i.e. the audio sample be
longer than the gap, the sample is shortened at
the end such that it lls the gap exactly.
If an audio sample is inserted at the end of the
storyboard and is longer than the last scene, it
is automatically trimmed in to the length of the
scene. Click on the audio sample to read the new
length in the bottom left-hand corner.
If the storyboard is subsequently lengthened,
the audio sample is trimmed out again (up to a
maximum of its original length).