


36
37
the unwanted noise and drag it at the same time
vertically downwards to dampen the sound. The
third point marks the end of the unwanted noise:
it should therefore also be at the same level
horizontally as the rst, but beyond the noise.
Click on "Create" to reduce the volume of the
unwanted noise substantially without changing
the remainder of the audio sample.
Audio mixing is now nished. Play the entire
lm from the Finish screen. If necessary, you can
make further corrections.
4.4 Tutorial 4: Titling 1
SMART EDIT provides high-performance titling
with which you can insert opening titles, end
credits, subtitles, etc. into your video project.
Again, you need an edited video to do this. This
can be a complete video lm project, but for this
exercise it is sufcient to have 3 or 4 scenes with
a length of about 10 seconds each.
Click on "Titling". This screen is very similar to
the "Image Processing" screen, because titling is
a similar task. A segment of the storyboard will
be modied, only in this case the modication is
an inserted text and not an effect.
As you have done when practicing image pro-
cessing effects, select a scene in the storyboard
for your rst title. You can simply take the rst
scene.
Step 1: Adding an Opening title
You will now insert an opening title to your
video project. This title will display the name of
the video on three xed text pages. From the
Main Menu, Click "Titling”. Once in the Titling
menu, select "Pages" and add this title effect
onto the storyboard.
Then click the "Enter/edit text" button in the
lower-right corner of the screen.
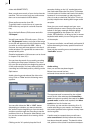
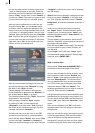
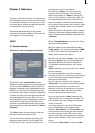
Now you are in the actual titling menu. The rst
frame of the scene appears in the background
of an operation panel. This screen serves as
orientation for text placement, font style, color
selection, and type size. Here you can immedia-
tely check how your title looks over the selected
scene, because the title is automatically updated
after every adjustment.
You will see some pre-loaded text already dis-
played on the Titling display. Delete this text by
placing the vertical bar (called cursor) after the
last word and pressing the delete key of your
external keyboard as many times as necessary
until all of the text is deleted.
If you aren't working with an external keyoard,
click onto "Text" to call up the on-screen key-
board. Now you can delete the given text by
clicking on the "Delete" key several times. Alter-
natively, you can click onto "Boxes" and select
"Delete", so that the panel with the default text
is deleted. Another box will be available for text
entry.
If you have deleted the box with the help of the
"Delete" button or with the on-screen keyboard,
click onto the "TE" ("Text Editor") button in the
lower right corner or onto the right trackball
button, to call up the main menu bar.
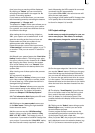
First, select a font. Click onto "Text" in the main
operation panel and then select "Font" to bring
up a selection window. The text MacroSystem
appears in the previously selected font. Select
the font Floyd for which you can then set the
size. Set the size to 130 and conrm your set-
tings by clicking on "OK".
The cursor over the display screen indicates the
current text position.
Use the keyboard to enter the text "Video title".
Remember, you can use the on-screen keyboard,
or the external Powerkey or USB keyboard.
Now you can go on to other settings using the
“Style” button. A screen appears, in which you