


82
83
(c) Using the Add button, insert an editing point
after the currently selected (green) point in the
volume display. Note that a point cannot be
inserted between two points located very close
to each other.
(d) Use the Remove button to delete the selec-
ted editing point from the volume display.
(e) The Range button can be used to group seve-
ral adjacent editing points to form a range, i.e. a
common group:
• Mark the outer left-hand (rst) point of the
desired range by left-clicking it or by stepping
through individual frames.
• Click on Range.
• Mark the outer right-hand (last) point of the
desired range by left-clicking it.
All points within the marked range also change
to green and are thus marked as active. The fol-
lowing functions can now be used on this range:
• Increase or reduce the volume level for the en-
tire range. Use the Level slider for this purpose.
• Move the position. Use either the Position sli-
der, or select the position by means of Range.
• Delete all points in the selected range. Click on
Remove in this case.
Click in the scrollbar beneath the volume display
or on any point to terminate selection of the
range.
(f) The Level determines the volume of the active
(green) editing point or of the selected range.
The volume can be selected in steps of 1 dB
from -30 dB to +30 dB.
(g) Use Position to determine the position (in
time) of a point or a range in the volume display.
(h) Use the Create button to launch creation of
the complete audio sample shown in the volume
display.
(i) Use Range to determine the position of an
editing point or a range according to its location
within the video.
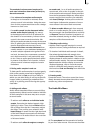
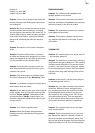
• During determination of the position of an in-
dividual point, the following menu is displayed
against the background of the current video:
Determine the position of the selected point eit-
her using the scrollbar following activation of
the Position switch, or by means of the arrow
buttons < and >.
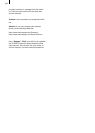
• When determining the position for a range, the
following menu is displayed against the back-
ground of the current video:
The position of a range is determined either
from the start point (Start) or the end point
(End), or by means of the arrow buttons < and >.
(j) Use the Play button to play the audio sample
currently shown in the wave form display, provi-
ded it has been calculated. The play position in
terms of time is shown next to the Play button
in minutes:seconds:frames. The instantaneous
play volume is shown on the volume display.
Play can be stopped at any time by means of the
Stop button.
Click on OK to terminate editing of the wave form
and to accept the settings. Note the following:
• The Volume and Correction controls are no
longer available for the edited audio sample
following editing of the wave forms. You can
therefore no longer modify the volume of the
wave form audio sample by means of the Volu-
me control, nor the volume of a parallel audio
sample in relation to the wave form audio
sample by means of the Correction control.
• Insertion of a fade into a wave form audio
sample deletes the edited wave form (following
a prompt). All changes to the wave form audio
sample are then lost.
• Indirect volume control of a wave form audio
sample is still possible by Correction from
another audio sample. Creation must however
be repeated.