


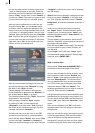

34
35
2. the rst insert
3. the background scene between the rst and
second insert
4. the second insert
5. and nally the rest of the background scene
after the second insert.
Now you can add the third insert to the remai-
ning segment at the end of the storyboard. Use
the procedure described above. Click on the last
scene in the storyboard, select the third insert
scene in the scene bin, then click on "Insert", and
nally shift the starting point appropriately.
The music video is now practically nished. The
draft version can be played. The background and
the insert segments alternate, and the music is
played in its entirety.
Step 3: Effects and nish
Now some transition effects will be added. This
is done the same as with the normal storyboard
created with "Add" (tutorial 1). Add some tran-
sition or image processing effects to your Insert
scenes. Lip synchronization is not affected.
Then go to the "Finish" screen from the Main
menu and click on "Create", but only after you
have selected the type of recording out (DV,
HDV or analog), if possible. This saves you from
being asked in every menu whether you have
already calculated everything. To the left of this
button you are informed whether effects and
audio in this menu have been created or not.
Tips:
We would like to call your attention now to some
specic issues regarding transitions placed on
Insert scenes:
– Transitions reveal a part of background mate-
rial that was completely masked by the Insert.
This is used to prevent an immediate "hard" cut
to the next scene. You may want to use an insert
clip to "mask" a distorted (e.g. jittery) video
segment. But if so, consider that the insert clip
should have some extra length if you wish to
use transition effects.
– You have the possibility to fade two insert
scenes into each other by connecting them with
a transition effect.
– The duration of the effect is limited by the du-
ration of the insert scene.
Now your music video should be nished! It
will probably not be a candidate for "MTV", but
you have learned the possibilities that the Insert
function offers you.
For example, you can show different camera
shots of a wedding ceremony without cutting off
the ow of the audio of the ceremony. You can
mask distorted segments, and you can achieve
picture-in-picture effects without affecting the
background audio. There are many possibilities
that you will certainly take advantage of in the
future.
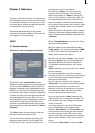
4.3 Tutorial 3: Audio mixing
This exercise will acquaint you in detail with the
possibilities of audio mixing. This exercise assu-
mes that you are already familiar with exercises
1 and 2.
The goal of this exercise is the perfect audio
mixing of a video with corrections to the original
sound, and with the addition of commentary and
background music.
Step 1: Preparations
You have already successfully made the various
connections.
Now you need some video. This you can easily
create after having worked through the previous
exercises. The video should be 2 to 4 minutes
long. All effects should be calculated. One of the
most important principles of audio mixing is that
the video itself should be completely nished.
Any changes to the video material can destroy
all the work you put into audio mixing!
After completion of video and audio mixing, it
is still possible to add scenes to the beginning
and end of the storyboard, or to delete scenes.
Depending on what you do you are given an
appropriate warning and you can then decide if
you want to go ahead with the action.
Insert scenes can be added without danger after
audio mixing, because they don't make any
changes in timing or audio.