


62
63
ping between long-term effects and titling is not
possible. (However, you can do this by using the
Special function in the Edit screen to create new
scenes with included IP effects.)
You can also choose between the "Trim“ and
"Position“ functions here as well. For further
information, please refer to the notes regarding
"Insert“ (Chapter 5.5, Point (12))
When you have set the range of your choice,
return to the "Image Processing" screen (click on
the right button).
If you have extended the effect to other scenes,
then you will also see the effect symbol in these
scenes. (By choosing the option "complete
scene" you can remove the selected effect from
the other scenes.) The range that you just set is
displayed in this button.
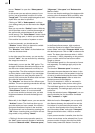
(9) Clicking on the "Preview" button opens a
small screen in which the video plus the effect
runs. In this way you can judge and perhaps
make corrections (for color, intensity, time, etc.)
to the effect before creating it.
The running time of the preview will correspond
approximately to the time of the calculated ef-
fect. The preview may be a little "jittery", becau-
se it does not run at the normal frame rate. This
will not occur in the created effect. A preview
requires no space on the hard-drive.
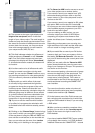
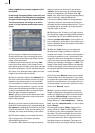
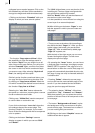
(10) After you have inserted an Image Proces-
sing effect and perhaps specied its range, you
can click on "Full Size" (if your system is provi-
ded with this function) to bring up an additional
menu. In the background you see the middle fra-
me of the entire segment for the inserted Image
Processing effect (if the effect is applied on the
entire scene, then you will see the middle frame
of the video scene).
An operating panel with effect options (to the
right, if there are any for the selected effect),
overlays the video.
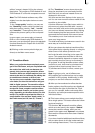
To the left you see the button "Display" with
four available possibilities. With "Original" you
can view your original scene. With "Effect" you
can observe your scene with the applied effect.
"Orig. + Effect" displays the original scene in the
left screen half and the applied effect in the right
half. In this way you can easily compare the
original with the applied effect.
The option "Compare" divides the screen into
two parts. To the right you see your new scene
(with effect) and to the left a scene that you
can freely choose from the scene bin using the
button "Choose scene" positioned below. This
lets you, for example, exactly adjust the color to
correspond to another scene.
Above the function "Display" you see the "Fra-
me" slider with which you can set the point in
time of the long-term effect that you want to
view.
In this way you can view the inserted effect at
any point in time of the scene. The button does
not have to be conrmed, so that you can scroll
slowly through the scene and view the effect at
the same time.
Of course, you can change the effect options as
you wish and thus have the possibility of directly
comparing various colors and directions.
The effect options can be set directly in this
window, while watching a real-time preview.
The selection of the sliders does not have to be
conrmed.
The effect options set in this menu are accep-
ted with "OK" and you are returned to the Edit
menu. With "Cancel" you exit the "Full Size"
menu without changes.
The arrow button serves to move the Single-
image menu to the upper screen edge.
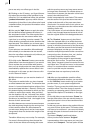
(11) When you click on the "Create" button a
window appears in which the effect can be view-
ed as it is created. After completed calculation
the outline of the effect symbol is blue.
When you calculate an effect SMART EDIT reads
all individual images from the scene in question
and applies the effect to it. The result is stored
on the hard drive. This procedure takes time and
consumes hard-drive capacity.
When recording data you should always leave a
small amount of hard drive capacity in reserve.
Depending on how often effects are used, this
should be between 2% and 10% of the video
playing time.
Although it is theoretically possible to apply
an effect to the entire video material, it is usu-
ally not meaningful to apply a general color or
brightness correction to all the footage. This
would require extensive hard-drive capacity
and would take a long time to be calculated. It is
better to make such corrections when recording
from the video input device using the sliders in
the "Video settings" screen.
(12) If the "Scene" button is available on your
system, you cam make use of the Multi-layer
technique.
If you would like to overlay several long-term ef-