


66
67
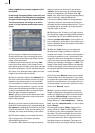
17. Out of focus: With this effect you can make
a scene appear blurred. You can set the blur
"Intensity" from 2-20. Under "In" and "Out" you
set the start and end points of the effect (up to
12 seconds).
18. Rectangle: A rectangle is inserted into your
video. You can set the "Position/Size" and the
"Color".
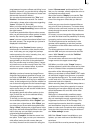
19. Relief: The video image is transformed into
a sort of 3-dimensional relief. It looks as if it has
been chiseled in stone – a single gray tone with
light and shadow at the edges. Edges appear
where the original has strongly contrasting
edges. The button "Direction" can be used to
change the illumination source in order to obtain
different effects. The arrow shows the direction
in which the light shines from.
20. Sharpen: Sometimes you may want to
improve a blurred segment of a scene (e.g. old
archive material). The degree of sharpness can
be set from 1-8 with the "Strength" control. The
preview does not do full justice to the result, so
you should experiment beforehand with a shor-
tened version (Edit/Copy, Trim) of the scene you
would like to correct.
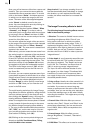
21. Solarize: The video is strongly altered with
this effect. The original colors are ignored and
new colors are created that are dependent on
the brightness. Black is replaced by blue, gray
values are converted to orange, yellow, green,
cyan, and even blue where the very brightest
image areas were. You can sometimes see simi-
lar images in TV science programs or in crime
movies as so-called "heat images". Hard transi-
tions may lead to shimmering edges, especially
for VHS or when using the CVBS connection.
The effect "CVBS lter" can be used to alleviate
this (before or after.)
You can set the "Saturation" from 0-100%. The
higher the percent number, the more color the
image has. For 0% you have a black-and-white
picture.
Tip: False colors are frequently used in science
to highlight small differences in brightness for
the human eye. The human eye can distinguish
only about 100 different levels of brightness, but
about 100,000 different colors.
22. Spread: Here you create a "shimmering"
image. This is achieved by distributing the pixels
within a circle (which you set with "Step" 1-10)
containing the original pixel.
23. White balance: In case recording has led to
erroneous white matching resulting in white
and gray surfaces that look wrong but the color
is OK, you can specify the location and size of
a rectangle with the button "Reference Color".
Then the color fault within the rectangle is
averaged and the deviations in the entire image
are canceled out. Note that only light color faults
can be improved. You can turn a red surface
into a gray one, but the effects on the rest of the
image are extreme (color distortion).
In the case that there is no colorless surface in
the image, then a color correction can only be
done with the effect "Control Color".
24. Zoom: A dened image area can be zoomed
in. Under "Position" you give the location and
size of the rectangle area. Under "Zoom In" and
"Zoom Out" you specify the start and end time
of the effect (up to 12 seconds).
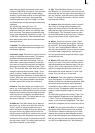
5.9 Titling
Titling functions much the same as if it were an
Image Processing effect. Titling is actually done
as a picture-editing effect. Instead of a "lter”,
digital text is added to your video.
Titling has two menus:
The settings in the "Titling" menu correspond
closely to those of the image processing effects
menu. You can read the corresponding descrip-
tion there for information about functions such
as Insert, Delete, Range, Preview, Single image,
Calculate, and Scene.
After you have selected a desired title effect, and
perhaps set further Options in the eld to the
right of the effect list, you must rst Add the ef-
fect into the storyboard. You can then enter the
Titler menu by clicking on the button "Enter/edit
Text" below the effect options.