


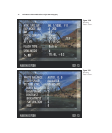
■ Mode dial. Rotate this dial to select from two fully automatic modes (Auto and
Auto No Flash), four advanced exposure modes (Manual, Aperture-priority,
Shutter-priority, and Program), 19 different Scene modes (first described in Chapter
2, and next in Chapter 4) selected by rotating the main command dial, plus two
User Setting positions, U1 and U2 (which each store a selection of settings for quick
retrieval).
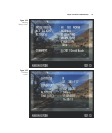
■ Release mode dial lock release. Before you can choose any of the release mode
dial’s settings, you must hold down this button to free the dial so it can rotate.
■ Release mode dial. Your choices include S (Single frame), C
L
(Continuous low
speed), C
H
(Continuous high speed), Quiet shutter release, Self-timer, Remote con-
trol, and Mup (Mirror Up). I’ll have more information on using these modes in
Chapter 2.
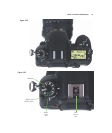
■ Accessory shoe. Slide an electronic flash into this mount when you need a more
powerful speedlight. A dedicated flash unit, like the Nikon SB-900, can use the
multiple contact points shown to communicate exposure, zoom setting, white bal-
ance information, and other data between the flash and the camera. There’s more
on using electronic flash in Chapter 12. You can also mount other accessories on
this shoe, such as the Nikon GP-1 GPS adapter.
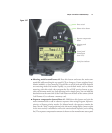
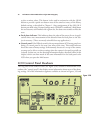
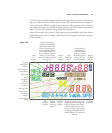
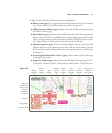
On the right side of the camera is another batch of controls and a display panel, as
shown in Figure 3.27:
■ Power switch. Rotate this switch clockwise to turn on the Nikon D7000 (and vir-
tually all other Nikon dSLRs). Continue past the ON position to illuminate the
monochrome LCD control panel’s backlight for a few seconds. If you’d rather have
the backlight remain on for the length of time the exposure meters are active, you
can specify this using the Custom Settings menu CSM #D11 (set to On). For this
setting to be useful, you’ll need to set the automatic meter-off delay to something
other than the default six seconds. If you’re carefree about battery usage, you can
specify meter-off delays of four seconds to 10 minutes using CSM #c2, as described
in Chapter 9.
■ Shutter release button. Partially depress this button to activate the exposure meter
(and the main and sub-command dials that adjust metering settings), lock in expo-
sure, and focus (unless you’ve redefined the focus activation button, as outlined in
Chapter 9). Press all the way to take the picture. Tapping the shutter release when
the camera has turned off the autoexposure and autofocus mechanisms reactivates
both. When a review image is displayed on the back-panel color LCD, tapping this
button removes the image from the display and reactivates the autoexposure and
autofocus mechanisms.
David Busch’s Nikon D7000 Guide to Digital SLR Photography76