


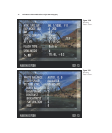
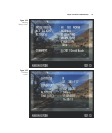
■ Photo Data. These are a series of up to eight screens (including GPS data, which
appears only if you used a GPS device to take the picture) that provide various types
of shooting and other information about a particular image that you are reviewing.
The data shown applies only to that image, and does not reflect your D7000’s cur-
rent shooting settings (unless you’re viewing an image you’ve just taken). I’ll show
you each of these screens, too, and explain how you can use them.
Using the Shooting Information Display
The shooting information display appears when you press the Info button to the lower
right of the color LCD. This display shows for about 10 seconds by default, but you
can change this to a period of up to 10 minutes using Custom Settings CSM #c4, as
described in Chapter 9. Hide this display by pressing the Info button twice, or by tap-
ping the shutter release button. (The D7000 will always clear the LCD screen when
you depress the shutter release button, and activate the exposure meter at the same time,
so you’ll be ready to take a shot if you want.)
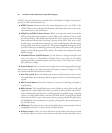
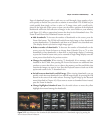
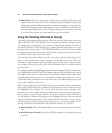
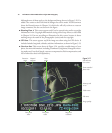
The shooting information display provides a lot of basic shooting data. Figure 3.15
shows a color-coded version. It does not appear colored like this on your LCD, and,
for clarity, I’m showing some options that don’t appear on the screen at the same time;
your display will have only some of the flash information that I’ve coded in pink in
my illustration.
I’ve applied some labels highlighting the basic kinds of settings you’ll find on this screen.
I’ve simplified the labels here; you’ll find similar callouts of the individual icons later in
this chapter in the section on the top-panel monochrome display, which largely dupli-
cates the information you see here. As I noted, this rendition just provides an overview
of the kind of data you’ll find on the color LCD; not every readout will appear on your
screen, and certainly not all at once.
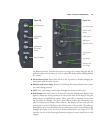
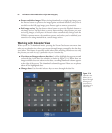
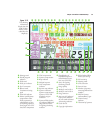
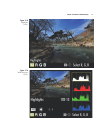
When the shooting information display is shown, press the Info button a second time,
and you’ll be able to change the parameters in the bottom two rows, shown in the yel-
low highlighted area in Figure 3.16. Use the multi selector buttons to navigate to the
parameter you want to adjust and press the OK button or the multi selector center but-
ton to produce a menu with your options. If you’ve set Custom Settings CSM #d5 to
On (the default), a handy tool tip appears near a highlighted entry, so you can easily tell
what each of the parameters does. Once you’ve learned the functions, you can turn the
tool tips off in the Custom Settings menu. The specs you can change include the fol-
lowing. (I’ll describe the options for each of them in Chapters 8, 9, and 10.)
■ Movie Quality. Select from eight different movie shooting resolutions and frame
rates.
■ Auto Distortion Control. Switch the D7000’s automatic lens distortion control
on or off.
David Busch’s Nikon D7000 Guide to Digital SLR Photography66