


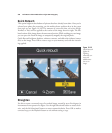

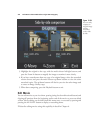
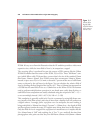

3. Adjust selected area. A wide yellow box (or a tall yellow box if the image is rotated
to vertical perspective on playback) highlights a small section of the image. (No,
we’re not going to create a panorama from that slice; this Nikon super-tricky fea-
ture has fooled you yet again.) Use the up/down buttons (or left/right buttons if
the image is displayed vertically) to move the yellow box, which represents the area
of your image that will be rendered in (fairly) sharp focus. The rest of the image
will be blurred.
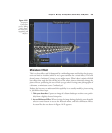
4. Preview area to be in sharp focus. Press the Zoom In button to preview the area
that will be rendered in sharp focus. Nikon labels this control Confirm, but that’s
just to mislead you. It’s actually just a preview that lets you “confirm” that this is
the area you want to emphasize.
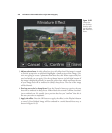
5. Apply the effect. Press the OK button to apply the effect (or the Playback button
to cancel). Your finished image will be rendered in a weird altered-focus way, as
shown in Figure 10.23.
David Busch’s Nikon D7000 Guide to Digital SLR Photography340
Figure 10.22
Choose the
area for sharp
focus by mov-
ing the yellow
box within the
frame.