


that I will give you the information you need in a much more helpful format, with
plenty of detail on why you should make some settings that are particularly cryptic.
I’m not going to waste a lot of space on some of the more obvious menu choices in these
chapters. For example, you can probably figure out that the Beep option in Custom
Settings menu CSM #d1 deals with the solid-state beeper in your camera that sounds
off during various activities (such as the self-timer countdown). You can certainly deci-
pher the import of the three options available for the Beep entry (High, Low, and Off).
In this chapter, I’ll devote no more than a sentence or two to the blatantly obvious set-
tings and concentrate on the more confusing aspects of the D7000 setup, such as auto-
matic exposure bracketing. I’ll start with an overview of using the D7000’s menus
themselves.
Anatomy of the Nikon D7000’s Menus
If you used any Nikon digital SLR before you purchased your Nikon D7000, you’re
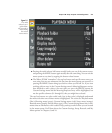
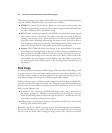
probably already familiar with the basic menu system. The menus consist of a series of
screens with entries, as shown in Figure 8.1. Navigating among the various menus is
easy and follows a consistent set of rules:
■ Press the MENU button to display the main menu screens.
■ Use the multi selector’s left/right/up/down buttons to navigate among the menu
entries to highlight your choice. Moving the highlighting to the left column lets
you scroll up and down among the six top-level menus. From the top in Figure 8.1,
they are Playback, Shooting, Custom Settings, Setup, Retouch, and My Menu, with
Help access represented by a question mark at the bottom of the column.
■ A highlighted top-level menu’s icon will change from black and white to yellow
highlighting. Use the multi selector’s right button to move into the column con-
taining that menu’s choices, and the up/down buttons to scroll among the entries.
If more than one screen full of choices is available, a scroll bar appears at the far
right of the screen, with a position slider showing the relative position of the cur-
rently highlighted entry.
■ To work with a highlighted menu entry, press the OK button in the center of the
multi selector, or just press the right button on the multi selector. Any additional
screens of choices will appear. You can move among them using the same multi
selector movements.
■ You can confirm a selection by pressing the OK button or, frequently, by pressing
the right button on the multi selector once again. Some functions require scrolling
to a Done menu choice, or include an instruction to set a choice using some other
button.
David Busch’s Nikon D7000 Guide to Digital SLR Photography214