


Initial Setup
David Busch’s Nikon D7000 Guide to Digital SLR Photography14
This section helps you familiarize yourself with the three important controls most used to
make adjustments: the multi selector and the main and sub-command dials. You’ll also
find information on charging the battery, setting the clock, mounting a lens, and making
diopter vision adjustments. If you’re comfortable with all these things, skim through and
skip ahead to “Changing Default Settings” in the next section.
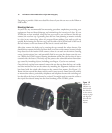
Once you’ve unpacked and inspected your camera, the initial setup of your Nikon
D7000 is fast and easy. Basically, you just need to charge the battery, attach a lens, and
insert a memory card. I’ll address each of these steps separately, but if you already are
confident you can manage these setup tasks without further instructions, feel free to
skip this section entirely. While most buyers of a D7000 tend to be experienced photo-
graphers, I realize that some readers are ambitious, if inexperienced, and should, at the
minimum, skim the contents of the next section, because I’m going to list a few options
that you might not be aware of.
Mastering the Multi Selector and Command Dials
I’ll be saving descriptions of most of the controls used with the Nikon D7000 until
Chapter 2, which provides a complete “roadmap” of the camera’s buttons and dials and
switches. However, you may need to perform a few tasks during this initial setup process,
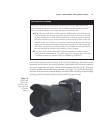
and most of them will require the MENU button and the multi selector pad. The
MENU button is easy to find: it’s located to the left of the LCD, the first button in the
series of four located to the left of the LCD. It requires almost no explanation; when
you want to access a menu, press it. To exit most menus, press it again.
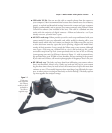
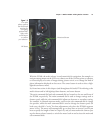
The multi selector pad may remind you of the similar control found on many point-
and-shoot cameras, and other digital SLRs. It consists of a thumbpad-sized button with
projections at the North, South, East, and West positions, plus a button in the center.
It can also be pushed in diagonal directions to give you Northeast, Southeast, Southwest,
and Northwest orientations. (See Figure 1.2.)
The multi selector on the D7000 functions slightly differently than its counterpart on
some other cameras. For example, some point-and-shoot models assign a function, such
as white balance or ISO setting, to one of the directional buttons (usually in conjunc-
tion with a function key of some sort). The use of the multi selector varies, even within
the Nikon dSLR line up. For example, many Nikon digital SLRs (such as the Nikon
D50/D70/D80) have no center button in the multi selector at all. Other Nikon cam-
eras (such as the D300/D300s and D3/D3x) allow assigning a function of your choice
to the multi selector center button.