


Using the Photo Data Displays
When reviewing an image on the screen, your D7000 can supplement the image itself
with a variety of shooting data, ranging from basic information presented at the bot-
tom of the LCD display, to three text overlays that detail virtually every shooting option
you’ve selected. There is also a display for GPS data if you’re using a GPS device, and
two views of histograms. There’s actually a third histogram view that can be summoned
when you reprogram the center button of the multi selector. I’ll explain how to do that
and how to work with histograms in the discussion on achieving optimum exposure in
Chapter 4. However, this is a good place to provide an overview of the kind of infor-
mation you can view when playing back your photos.
You can change the types of information displayed using the Display Mode entry in the
Playback menu. There you will find checkboxes you can mark for both basic photo
information (overexposed highlights and the focus point used when the image was cap-
tured) and detailed photo information (which includes an RGB histogram and various
data screens). I’ll show you how to activate these info options in Chapter 8, and pro-
vide more detailed reasons why you might want to see this data when you review your
pictures. This section will simply show you the type of information available. Most of
the data is self-explanatory, so the labels in the accompanying figures should tell you
most of what you need to know. To change to any of these views while an image is on
the screen in Playback mode, press the multi selector up/down buttons.
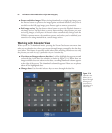
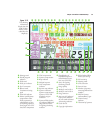
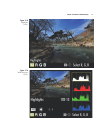
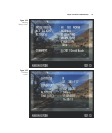
■ File information screen. The basic full image review display is officially called the
file information screen, and looks like Figure 3.17. Press the multi selector down
button to advance to the next information screen.
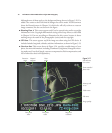
■ Highlights. When highlights display is active (after being chosen in the Display
Mode entry of the Playback menu, as described in Chapter 8), any overexposed
areas will be indicated by a flashing black border. As I am unable to make the
printed page flash, you’ll have to check out this effect for yourself. You can visual-
ize what these “blinkies” look like in Figure 3.18.
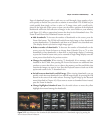
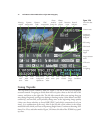
■ RGB Histogram. Another optional screen is the RGB histogram, which you can
see in Figure 3.19. I’m going to leave the discussion of histograms for Chapter 4.
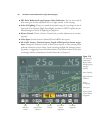
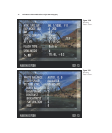
■ Shooting Data 1. This is the first in a series of three screens that collectively pro-
vide everything else you might want to know about a picture you’ve taken. I’m not
providing any labels in Figure 3.20, because the information in the first seven lines
in the screen should be obvious.
■ Shooting Data 2. This screen shows white balance data and adjustments, the color
space you’ve selected, and lists any Picture Control tweaks you’ve entered. (See
Figure 3.21.)
■ Shooting Data 3. The next screen shows any noise reduction you’ve specified,
Active D-Lighting status, and any Retouch menu changes you may have made.
Chapter 3 ■ Nikon D7000 Roadmap 69