


The latest version of Photoshop includes a built-in RAW plug-in that is compatible with
the proprietary formats of a growing number of digital cameras, both new and old, and
which can perform a limited number of manipulations on JPEG and TIFF files, too.
This plug-in also works with Photoshop Elements, but with fewer features. Here’s how
easy it is to manipulate a RAW file using the Adobe converter:
1. Transfer the RAW images from your camera to your computer’s hard drive.
2. In Photoshop, choose Open from the File menu, or use Organizer or Bridge
(depending on the version you have installed).
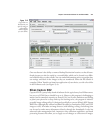
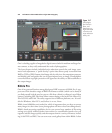
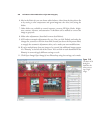
3. Select a RAW image file. The Adobe Camera Raw plug-in will pop up, showing a
preview of the image, like the one shown in Figure 13.9.
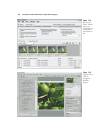
4. If you like, use one of the tools found in the toolbar at the top left of the dialog
box. From left to right, they are:
■ Zoom. Operates just like the Zoom tool in Photoshop.
■ Hand. Use like the Hand tool in Photoshop.
■ White Balance. Click an area in the image that should be neutral gray or white
to set the white balance quickly.
■ Color Sampler. Use to determine the RGB values of areas you click with this
eyedropper.
■ Crop. Pre-crops the image so that only the portion you specify is imported into
Photoshop. This option saves time when you want to work on a section of a large
image, and you don’t need the entire file.
■ Straighten. Drag in the preview image to define what should be a horizontal or
vertical line, and ACR will realign the image to straighten it.
■ Retouch. Used to heal or clone areas you define.
■ Red-Eye Removal. Quickly zap red pupils in your human subjects.
■ ACR Preferences. Produces a dialog box of Adobe Camera Raw preferences.
■ Rotate Counterclockwise. Rotates counterclockwise in 90-degree increments
with a click.
■ Rotate Clockwise. Rotates clockwise in 90-degree increments with a click.
5. Using the Basic tab, you can have ACR show you red and blue highlights in the
preview that indicate shadow areas that are clipped (too dark to show detail) and
light areas that are blown out (too bright). Click the triangles in the upper-left cor-
ner of the histogram display (shadow clipping) and upper-right corner (highlight
clipping) to toggle these indicators on or off.
Chapter 13 ■ Useful Software for the Nikon D7000 455