


10. At the bottom of the next dialog box that appears, check the box that says, “Attempt
to Automatically Align Source Images,” then click OK. The images will load; it may
take several minutes for the program to load the images and attempt to arrange
them into layers that are aligned based on their content.
11. Once the program has finished processing the images, go to the Layers panel and
select all of the layers. You can do this by clicking on the top layer and then Shift-
clicking on the bottom one.
12. While the layers are all selected, in Photoshop go to Edit > Auto-Blend Layers. In
the dialog box that appears, select the two options, Stack Images and Seamless Tones
and Colors, then click OK. The program will process the images, possibly for a con-
siderable length of time.
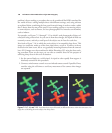
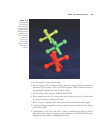
13. If the procedure worked well, the result will be a single image made up of numer-
ous layers that have been processed to produce a sharply focused rendering of your
subject. If it did not work well, you may have to take additional images the next
time, focusing very carefully on small slices of the subject as you move progressively
farther away from the lens.
Although this procedure can work very well in Photoshop CS4 and CS5, you also may
want to try it with programs that were developed more specifically for focus stacking
and related procedures, such as Helicon Focus (www.heliconsoft.com), PhotoAcute
(www.photoacute.com), or CombineZM (www.hadleyweb.pwp.blueyonder.co.uk).
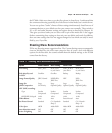
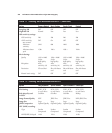
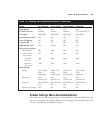
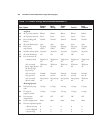
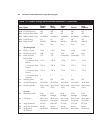
Recommended Customized Settings
I’m going to finish off this chapter with some tables listing recommended settings for
your Shooting and Custom Settings menus. I’ve divided the recommended settings into
a group of tables, rather than one or two huge tables that would be more difficult to
read. The tables show the “default” settings for the Shooting banks and Custom Settings
menus, as they come from the factory, plus eight groups intended for Basic, Studio Flash,
Portrait, Long Exposure, Sports—Indoors, Sports—Outdoors, Landscapes, and
Portraits. For the Custom Settings menu, I add one more group of settings, for expo-
sure bracketing.
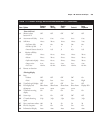
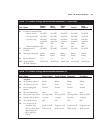
Each setting includes options that I consider best-suited for their particular shooting
situations. For example, when I am bracketing exposures, I like to shoot off a single
bracket burst fairly quickly, so I choose C
L
release mode, with the shooting speed set
to 4 frames per second. When I press the shutter release, all the exposures are taken con-
secutively in a brief period of time. Similarly, when I am shooting indoor sports, I like
to use ISO 1600 and set my autofocus priority to Release. That lets me shoot bursts of
pictures with minimal shutter lag when I press the shutter release button, but still gives
David Busch’s Nikon D7000 Guide to Digital SLR Photography200