


largest paper your printer can handle. (I don’t recommend just displaying the file on
your monitor and focusing on that; it’s unlikely you’ll have the monitor screen lined up
perfectly perpendicular to the camera sensor.) Then, follow these steps:
1. Position the camera. Place your Nikon D7000 on a sturdy tripod with a remote
release attached, positioned at roughly eye-level at a distance from a wall that rep-
resents the distance you want to test for. Keep in mind that autofocus problems can
be different at varying distances and lens focal lengths, and that you can enter only
one correction value for a particular lens. So, choose a distance (close-up or mid
range) and zoom setting with your shooting habits in mind.
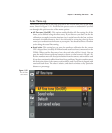
2. Set the autofocus mode. Choose the autofocus mode (AF-C or AF-S) you want
to test.
3. Level the camera (in an ideal world). If the wall happens to be perfectly perpen-
dicular, you can use a bubble level, plumb bob, or other device of your choice to
ensure that the camera is level to match. Many tripods and tripod heads have bub-
ble levels built in. Avoid using the center column, if you can. When the camera is
properly oriented, lock the legs and tripod head tightly.
4. Level the camera (in the real world). If your wall is not perfectly perpendicular,
use this old trick. Tape a mirror to the wall, and then adjust the camera on the tri-
pod so that when you look through the viewfinder at the mirror, you see directly
into the reflection of the lens. Then, lock the tripod and remove the mirror.
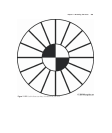
5. Mount the test chart. Tape the test chart on the wall so it is centered in your cam-
era’s viewfinder.
6. Photograph the test chart using AF. Allow the camera to autofocus, and take a
test photo, using the remote release to avoid shaking or moving the camera.
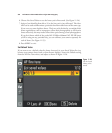
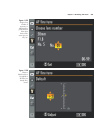
7. Make an adjustment and rephotograph. Make a fine-tuning adjustment and
photograph the target again. Follow the instructions in the next section. I’ve sepa-
rated the fine-tuning adjustments from these steps because some people may want
to just tweak the focus at a later time without going through all these evaluation
steps. Repeat steps 1-8 in the section that follows this one to make evaluation images
at a range of corrections, say, –5 through +5.
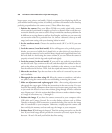
8. Evaluate the image. If you have the camera connected to your computer with a
USB cable and Camera Control Pro or other linkup software such as Nikon
Transfer, or through a WiFi connection, so much the better. You can view the image
after it’s transferred to your computer. Otherwise, carefully open the camera card
door and slip the memory card out and copy the images to your computer.
9. Evaluate focus. Which image is sharpest? That’s the setting you need to use for this
lens. If your initial range doesn’t provide the correction you need, repeat the steps
between –20 and +20 until you find the best fine-tuning.
David Busch’s Nikon D7000 Guide to Digital SLR Photography390