


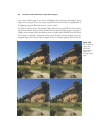

ISO 6400 can generate good results. Some kinds of subjects may not require this kind
of noise cancellation, such as those that have a texture of their own that tends to hide
or mask the noise.
ISO Sensitivity Settings
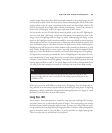
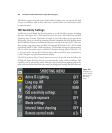
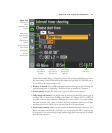
You’ll have to scroll down the Shooting menu to see the final five options, including
this one. (See Figure 8.31.) This menu entry has two parts, ISO Sensitivity and ISO
Sensitivity Auto Control. The former is simply a screen that allows you to specify the
ISO setting, just as you would by spinning the main command dial while holding down
the ISO button, located second from the bottom to the left of the color LCD. The avail-
able settings range from Auto and ISO 100 through ISO 6400 to Hi 1 (ISO 12800
equivalent) and Hi 2 (ISO 25600 equivalent). The available settings are determined by
the size of the increment you’ve specified in Custom Settings menu CSM #b1: 1/3
or 1/2 step values. Use the ISO sensitivity menu when you find it more convenient to
set ISO using the top-panel monochrome display.
The ISO Sensitivity Auto Control menu entry lets you specify how and when the
D7000 will adjust the ISO value for you automatically under certain conditions. This
capability can be potentially useful, although experienced photographers tend to shy
away from any feature that allows the camera to change basic settings like ISO that have
David Busch’s Nikon D7000 Guide to Digital SLR Photography266
Figure 8.31
Scroll down to
see the last five
entries in the
Shooting
menu.