


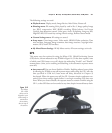


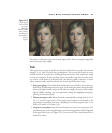
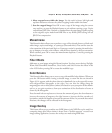
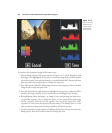
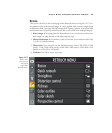

If no red-eye is found, a copy is not created. Figure 10.12 shows an original image (left)
and its processed copy (right).
Trim
This option creates copies in specific sizes based on the final size you select, chosen from
among 3:2, 4:3, and 5:4 aspect ratios (proportions). You can use this feature to create
smaller versions of a picture for e-mailing without the need to first transfer the image
to your own computer. If you’re traveling, create your smaller copy here, insert the mem-
ory card in a card reader at an Internet café, your library’s public computers, or some
other computer, and e-mail the reduced-size version. Just follow these steps:
1. Select your photo. Choose Trim from the Retouch menu. You’ll be shown the stan-
dard Nikon D7000 image selection screen. Scroll among the photos using the multi
selector left/right buttons, and press OK when the image you want to trim is high-
lighted. While selecting, you can temporarily enlarge the highlighted image by
pressing the Zoom In button.
2. Choose your aspect ratio. Rotate the main command dial to change from 3:2, 4:3,
5:4, 1:1, and 16:9 aspect ratios. These proportions happen to correspond to the
proportions of common print sizes, including the two most popular sizes: 4 × 6
inches (3:2) and 8 × 10 inches (5:4).
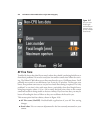
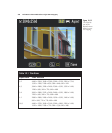
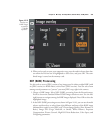
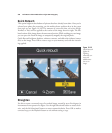
3. Crop in on your photo. Press the Zoom In button to crop in on your picture. The
pixel dimensions of the cropped image at the selected proportions will be displayed
in the upper-left corner (see Figure 10.13) as you zoom. The current framed size is
outlined in yellow.
Chapter 10 ■ Setup: The Setup Menu, Retouch Menu, and My Menu 329
Figure 10.12
Wider pupils
(left) can lead
to red-eye
effects; the
Nikon D7000’s
red-eye reduc-
tion lamp can
cause pupils to
contract
(right).