


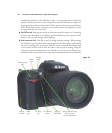

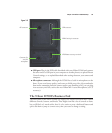
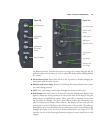
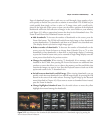
You’ll be using the four buttons to the left of the LCD (shown in Figure 3.8) quite fre-
quently, so learn their functions now.
■ MENU button. Summons/exits the menu displayed on the rear LCD of the
D7000. When you’re working with submenus, this button also serves to exit a sub-
menu and return to the main menu.
■ Help/Protect/White balance button. When viewing most menu items on the
LCD, pressing this button produces a concise Help screen with tips on how to make
the relevant setting. This double-duty button also can be used to protect an image
from accidental erasure when reviewing a picture on the LCD. Press once to pro-
tect the image, a second time to unprotect it. A key symbol appears when the image
is displayed to show that it is protected. (This feature safeguards an image from era-
sure when deleting or transferring pictures only; when you format a card, protected
images are removed along with all the others.) The button also summons the white
balance settings.
■ Thumbnail/Zoom Out/ISO button. Use this button to change from full-screen
view to six, nine, or 72 thumbnails, Calendar View, or to zoom out. I’ll explain
zooming and other playback options in the next section. The button also accesses
ISO sensitivity settings.
■ Zoom In button. Press to zoom in on an image, and to select image quality settings.
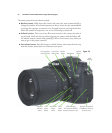
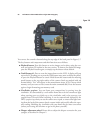
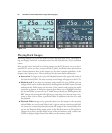
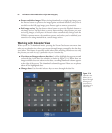
More buttons reside on the right side of the back panel, as shown in Figure 3.9. The
key controls and their functions are as follows:
■ Live View switch. Rotate this momentary-contact switch clockwise to turn on Live
View and enable movie shooting. Rotate it again to turn Live View/moving shoot-
ing off.
■ Movie-record button. Press the red button to start movie shooting, and again to
stop shooting.
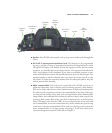
■ Multi selector. This joypad-like button can be shifted up, down, side to side, and
diagonally for a total of eight directions, or pressed. It can be used for several func-
tions, including AF point selection, scrolling around a magnified image, trimming
a photo, or setting white balance correction. Within menus, pressing the up/down
arrows moves the on-screen cursor up or down; pressing towards the right selects
the highlighted item and displays its options; pressing left cancels and returns to
the previous menu.
■ OK button. The button in the center of the multi selector can be pressed to choose
a highlighted selection in a menu and to confirm choices.
■ Infrared receiver. This is one of two IR sensors on the camera; the other is located
on the front. Both are active at the same time when the release mode dial is set to
David Busch’s Nikon D7000 Guide to Digital SLR Photography58