


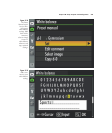

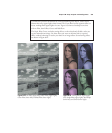
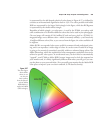
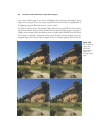

When you press the Thumbnail/Zoom Out button, a grid display, like the one shown in
Figure 8.25, appears, showing the relative contrast and saturation of each of the prede-
fined Picture Controls. If you’ve created your own custom Picture Controls, they will
appear on this grid, too, represented by the numbers 1-9. Because the values for auto-
contrast and autosaturation may vary, the icons for any Picture Control that uses the Auto
feature will be shown on the grid in green, with lines extending up and down from the
icon to tip you off that the position within the coordinates may vary from the one shown.
David Busch’s Nikon D7000 Guide to Digital SLR Photography256
Figure 8.25
This grid shows
the relationship
of the Picture
Controls being
used.
Amount
of contrast
Press Thumbnail/Zoom
Out to return to
Picture Controls list
Press multi selector
right button to
adjust style
Press OK
when done
Picture Control
using Auto
contrast or
saturation
User-defined
Picture Control
Amount of
saturation
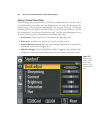
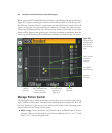
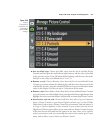
Manage Picture Control
The Manage Picture Control menu entry can be used to create new styles, edit existing
styles, rename or delete them, and store/retrieve them from the memory card. Here are
the basic functions of this menu item, which can be found on the Shooting menu
directly below the Set Picture Control entry:
■ Make a copy. Choose Save/Edit, select from the list of available Picture Controls,
and press OK to store that style in one of the user-defined slots C-1 to C-9 (with
slots C1 to C7 shown in Figure 8.26).