


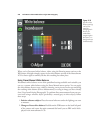


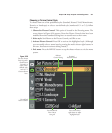
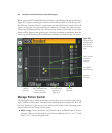
5. Change other attributes. Scroll down to the Sharpening, Contrast, Brightness,
Saturation, and Hue sliders with the multi selector up/down buttons, then use the
left/right buttons to decrease or increase the effects. A line will appear under the
original setting in the slider whenever you’ve made a change from the defaults. Note:
You can’t adjust contrast and brightness when Active D-Lighting (discussed later in
this chapter) is active. Turn it off to make those Picture Control adjustments. An
icon at the upper right of the screen shows whether Active D-Lighting is on or off.
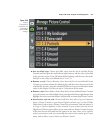
6. Or use auto adjustments. Instead of making changes with the slider’s scale, you
can move the cursor to the far left and choose A (for auto) instead when working
with the Sharpening, Contrast, and Saturation sliders. The D7000 will adjust these
parameters automatically, depending on the type of scene it detects.
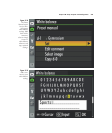
7. To Reset Values. Press the Trash button to reset the values to their defaults.
8. View adjustment grid. Press the Thumbnail/Zoom Out button to view an adjust-
ment grid (discussed next).
9. Confirm changes. Press OK when you’re finished making adjustments.
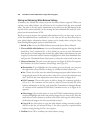
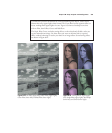
The changes Picture Controls make to your images are more subtle than you realize,
because the values that are applied among the various Picture Controls aren’t absolute.
Adjustments you make to, say, the Standard or Vivid styles are relative to the base
values of those styles themselves. For example, the Standard style is inherently less
saturated than the Vivid style, so if you move the Saturation slider two notches to the
right, you’ll end up with a modified Standard style that is still less saturated than the
Vivid style’s default. You’ll want to learn exactly what happens to your images when you
adjust each individual Picture Control, and, moreover, use the right Picture Control as
your base or “parent” style when creating Picture Controls of your own. If you wanted
a very, very saturated Picture Control, you’d start with the Vivid style, then adjust that
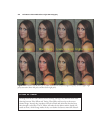
and save it as Super Vivid (or something along those lines). Figure 8.22 shows pairs of
images that compare four of the most frequently adjusted attributes.
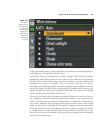
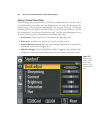
Editing the Monochrome style is similar to modifying the other styles, except that the
parameters differ slightly. Sharpening, Contrast, and Brightness are available, but,
instead of Saturation and Hue, you can choose a filter effect (Yellow, Orange, Red,
Green, or none) and a toning effect (black-and-white, plus seven levels of Sepia,
Cyanotype, Red, Yellow, Green, Blue Green, Blue, Purple Blue, and Red Purple). (Keep
in mind that once you’ve taken a JPEG photo using a Monochrome style, you can’t con-
vert the image back to full color.)
Chapter 8 ■ Setup: Playback and Shooting Menus 253