


■ 2. A pair of shots will be taken, one with ADL turned off (your “control”, so to
speak), and a second shot with ADL applied at the setting you specified in the
Shooting menu (Auto, Extra High, High, Normal, or Low). However, if you have
turned ADL off in the Shooting menu, the D7000 will take the second shot using
Auto, in effect overriding the Off setting you made. Confusing, but this provision
allows you to keep ADL turned off, and then temporarily activate it in Auto mode
just by selecting an ADL bracket burst.
■ 3. Three shots will be taken in the bracket sequence, one with ADL Off, a second
using Normal ADL, and a third at the High setting.
As with exposure, flash, and WB bracketing, remember to turn off ADL bracketing
when you no longer want to use it.
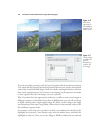
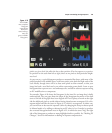
Bracketing and Merge to HDR
While my goal in this book is to show you how to take great photos in the camera rather
than how to fix your errors in Photoshop, the Merge to HDR (high dynamic range)
feature in Adobe’s flagship image editor is too cool to ignore. The ability to have a brack-
eted set of exposures that are identical except for exposure is key to getting good results
with this Photoshop feature, which allows you to produce images with a full, rich
dynamic range that includes a level of detail in the highlights and shadows that is almost
impossible to achieve with digital cameras. In contrasty lighting situations, even the
Nikon D7000 has a tendency to blow out highlights when you expose solely for the
shadows or midtones.
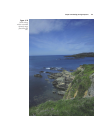
Suppose you wanted to photograph a dimly lit room that had a bright window show-
ing an outdoors scene. Proper exposure for the room might be on the order of 1/60th
second at f/2.8 at ISO 200, while the outdoors scene probably would require f/11 at
1/400th second. That’s almost a 7 EV step difference (approximately 7 f/stops) and well
beyond the dynamic range of any digital camera, including the Nikon D7000.
When you’re using Merge to HDR, you’d take two to three pictures, one for the shad-
ows, one for the highlights, and perhaps one for the midtones. Then, you’d use the
Merge to HDR command to combine all of the images into one HDR image that inte-
grates the well-exposed sections of each version. You can use the Nikon D7000’s brack-
eting feature to produce those images.
The images should be as identical as possible, except for exposure. So, it’s a good idea
to mount the D7000 on a tripod, use a remote release like the Nikon MC-DC2, and
take all the exposures in one burst. Just follow these steps:
1. Mount the D7000 on a tripod and connect the remote release cable.
2. Press the bracketing setting button and rotate the sub-command dial to set the
increment to 2EV. Merge to HDR works best with a significant difference in expo-
sure between the bracketed shots; subtle changes are not better here.
David Busch’s Nikon D7000 Guide to Digital SLR Photography124