


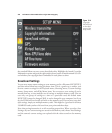


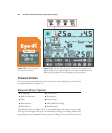
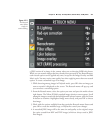
D-Lighting
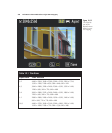
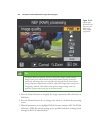
This option brightens the shadows of pictures that have already been taken. Once you’ve
selected your photo for modification, you’ll be shown side-by-side images with the unal-
tered version on the left, and your adjusted version on the right. Press the multi selec-
tor’s up/down buttons to choose from High, Normal, or Low corrections. Press the
Zoom In button to magnify the image. When you’re happy with the corrected image
on the right, compared to the original on the left, press OK to save the copy to your
memory card.
Red-Eye Correction
This Retouch menu tool can be used to remove the residual red-eye look that remains
after applying the Nikon D7000’s other remedies, such as the red-eye reduction lamp.
(You can use the red-eye tools found in most image editors, as well.)
Your Nikon D7000 has a fairly effective red-eye reduction flash mode. Unfortunately,
your camera is unable, on its own, to totally eliminate the red-eye effects that occur when
an electronic flash (or, rarely, illumination from other sources) bounces off the retinas
of the eye and into the camera lens. Animals seem to suffer from yellow or green glow-
ing pupils, instead; the effect is equally undesirable. The effect is worst under low-light
conditions (exactly when you might be using a flash) as the pupils expand to allow more
light to reach the retinas. The best you can hope for is to reduce or minimize the red-
eye effect.
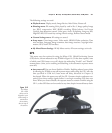
The best way to truly eliminate red-eye is to raise the flash up off the camera so its illu-
mination approaches the eye from an angle that won’t reflect directly back to the retina
and into the lens. The extra height of the built-in flash may not be sufficient, however.
That alone is a good reason for using an external flash. If you’re working with your
D7000’s built-in flash, your only recourse may be to switch on the red-eye reduction
flash mode. That causes a lamp on the front of the camera to illuminate with a half-
press of the shutter release button, which may result in your subjects’ pupils contract-
ing, decreasing the amount of the red-eye effect. (You may have to ask your subject to
look at the lamp to gain maximum effect.)
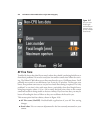
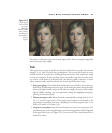
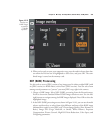
If your image still displays red-eye effects, you can use the Retouch menu to make a
copy with red-eye reduced further. First, select a picture that was taken with flash (non-
flash pictures won’t be available for selection). After you’ve selected the picture to process,
press OK. The image will be displayed on the LCD. You can magnify the image with
the Zoom In button, scroll around the zoomed image with the multi selector buttons,
and zoom out with the Zoom Out button. While zoomed, you can cancel the zoom by
pressing the OK button.
When you are finished examining the image, press OK again. The D7000 will look
for red-eye, and, if detected, create a copy that has been processed to reduce the effect.
David Busch’s Nikon D7000 Guide to Digital SLR Photography328