


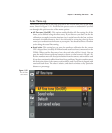

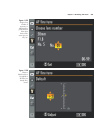


■ Default. This entry often confuses. It is a value that is applied to every lens mounted
on the camera that doesn’t already have a customized saved value associated with it.
That is, if your D7000 has consistent front or back focus problems with all lenses,
you can enter a value here, and the camera will apply the correction to each CPU
lens you use. This default setting can be overridden by saved values you’ve stored
for particular lenses. So, you can change the default focal plane for all lenses, and
still further fine-tune specific lenses that need more autofocus correction. My rec-
ommendation is that if your camera and lenses are so out of whack that you need
global correction and individual fine-tuning, you really ought to consider shipping
the whole kit off to Nikon for proper calibration.
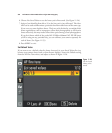
■ List saved values. This screen shows you the saved fine-tuning values for all lenses.
If the currently mounted lens has a stored value, it will be marked with a solid black
box icon. You can delete lenses from this list by highlighting them and pressing the
Trash button. You can also change the number (a two-digit number from 00-99)
used to identify a particular lens.
Evaluate Current Focus
The first step is to capture a baseline image that represents how the lens you want to
fine-tune autofocuses at a particular distance. You’ll often see advice for photographing
a test chart with millimeter markings from an angle, and the suggestion that you auto-
focus on a particular point on the chart. Supposedly, the markings that actually are in
focus will help you recalibrate your lens. The problem with this approach is that the
information you get from photographing a test chart at an angle doesn’t actually tell you
what to do to make a precise correction. So, your lens back focuses three millimeters
behind the target area on the chart. So what? Does that mean you change the Saved
Value by –3 clicks? Or –15 clicks? Angled targets are a “shortcut” that don’t save you
time.
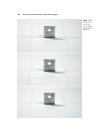
Instead, you’ll want to photograph a target that represents what you’re actually trying
to achieve: a plane of focus locked in by your lens that represents the actual plane of
focus of your subject. For that, you’ll need a flat target, mounted precisely perpendicu-
lar to the sensor plane of the camera. Then, you can take a photo, see if the plane of
focus is correct, and if not, dial in a bit of fine-tuning in the AF Fine tuning menu, and
shoot again. Lather, rinse, and repeat until the target is sharply focused.
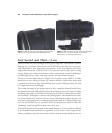
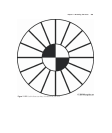
You can use the focus target shown in Figure 11.22, or you can use a chart of your own,
as long as it has contrasty areas that will be easily seen by the autofocus system, and
without very small details that are likely to confuse the AF. Download your own copy
of my chart from www.nikonguides.com/FocusChart.pdf. Then print out a copy on the
David Busch’s Nikon D7000 Guide to Digital SLR Photography388