


4. Choose bracket increment. With the setting button still held down, rotate the
sub-command dial to choose the exposure increment, 0.3, 0.7, 1.0, 1.3, 1.7, or 2.0
EV (unless you’ve redefined the exposure compensation increment in CSM #b2).
BKT will be displayed in the viewfinder and top-panel LCD.
5. Frame and shoot. As you take your photos, the camera will vary exposure, flash
level, or white balance for each image, based on the bracketing “program” you
selected, and in the order you specified in CSM #e6. In Single frame mode, you’ll
need to press the shutter release button the number of times you specified for the
exposures in your bracketed burst (2 or 3 shots). I’ve found it easy to forget that I
am shooting bracketed pictures, stop taking my sequence, and then wonder why
the remaining pictures in my defined burst are “incorrectly” exposed. To avoid that,
I often set the D7000 to one of the two continuous shooting modes, so that all my
bracketed pictures are taken at once. The D7000 does provide those indicators on
the monochrome LCD (a BKT indicator as well as a bracketing progress indica-
tor), but they may be overlooked.
6. Turn bracketing off. When you’re finished bracketing shots, remember to press
the bracket setting button and rotate the main command dial until the number of
shots in the sequence is 0F, and the BKT indicator is no longer displayed.
White Balance Bracketing
When you choose white balance bracketing, the D7000 does not take three different
exposures. There’s no need, if you think about it. The camera always takes a RAW expo-
sure first, no matter whether the camera is set to JPEG, RAW, or RAW+JPEG. If you’ve
selected JPEG-only mode, the camera converts the initial RAW exposure to JPEG for-
mat using the settings you’ve opted for in the camera, and then discards the RAW data.
In RAW mode, the camera stores the RAW data as an NEF file, and also creates a Basic
JPEG version of the image that is embedded in the RAW file as a thumbnail. That
thumbnail is what you’re actually looking at on the back-panel LCD when you review
your pictures; you never actually see the RAW file itself until you import it into your
image editor. Your computer may also use the embedded JPEG file, when it displays a
RAW image. Finally, if you save in RAW+JPEG, you end up with two files: the NEF
RAW file (with its embedded JPEG image) and a separate JPEG file at the quality level
you specify (Fine, Normal, or Basic).
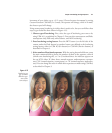
Since the RAW file that the camera initially captures contains all the digital informa-
tion captured during exposure, when you specify white balance bracketing, the D7000
needs to take only one picture—and then save a JPEG file at each of the required white
balance settings. One snap, and you get either two or three JPEG files at the quality
level you specified, bracketed as you directed. Very slick. As you might guess, WB brack-
eting is applied only to JPEG files; you can’t specify WB bracketing if you’ve chosen
RAW or RAW+JPEG. RAW files created are always unmodified, and will be converted
David Busch’s Nikon D7000 Guide to Digital SLR Photography122