


recall custom white balance settings suitable for environments with unusual lighting or
mixed lighting, as described later in this section.
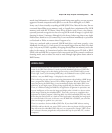
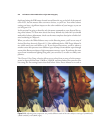
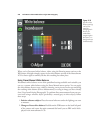
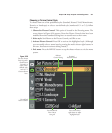
For all other settings (Auto, Incandescent, Direct Sunlight, Flash, Cloudy, or Shade),
highlight the white balance option you want, then press the multi selector right button
(or press OK) to view the fine-tuning screen shown in Figure 8.16 (and which uses the
Incandescent setting as an example). The screen shows a grid with two axes, a
blue/amber axis extending left/right, and a green/magenta axis extending up and down
the grid. By default, the grid’s cursor is positioned in the middle, and a readout to the
right of the grid shows the cursor’s coordinates on the A-B axis (yes, I know the display
has the end points reversed) and G-M axis at 0,0.
You can use the multi selector’s up/down and right/left buttons to move the cursor to
any coordinate in the grid, thereby biasing the white balance in the direction(s) you
choose. The amber-blue axis makes the image warmer or colder (but not actually yel-
low or blue). Similarly, the green-magenta axis preserves all the colors in the original
image, but gives them a tinge biased toward green or magenta. Each increment equals
about five mired units, but you should know that mired values aren’t linear; five mireds
at 2,500K produces a much stronger effect than five mireds at 6,000K. If you really
want to fine-tune your color balance, you’re better off experimenting and evaluating the
results of a particular change.
Chapter 8 ■ Setup: Playback and Shooting Menus 245
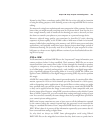
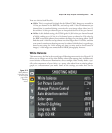
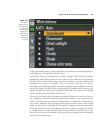
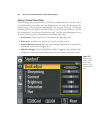
Figure 8.15
The White
Balance menu
has predefined
values, plus
the option of
setting color
temperature
and presets
you measure
yourself.