


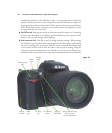

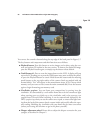
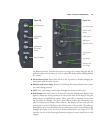
■ Lens autofocus/manual switch. You can change from Autofocus mode to Manual
using this switch, or the switch on the camera body.
■ Neck strap lug. It comes with a split-ring attached that can be used to fasten a neck
strap to the D7000.
■ Microphone. The D7000 has a microphone built into the front of the camera, seen
as a trio of holes set in a horizontal line.
■ Port covers. These two rubber covers protect the USB, TV, HDMI, microphone
ports, and GPS/accessory terminals when not in use.
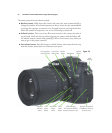
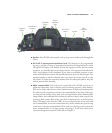
■ Focus mode selector switch. Rotate to change from autofocus to manual focus.
You should remember that the modes selected with this switch and the autofo-
cus/manual focus switch on the lens must agree. If you’ve chosen A (or M/A, which
allows for manual fine-tuning of autofocus) on the lens, then the camera body
switch must be set to either AF. If either the lens or body switch (or both) are set
to M, then the lens must be focused manually.
■ Focus mode. Press this button and rotate the main command dial to change from
Continuous-servo autofocus (AF-C) to Single-servo autofocus (AF-S) or Manual
focus (M). Rotate the sub-command dial to change autofocus area selection modes.
Both options were described in Chapter 2, and will be explained in more detail in
Chapter 4.
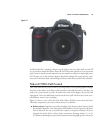
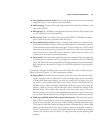
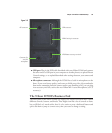
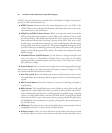
Controls for using the D7000’s built-in electronic flash (also called a strobe or speed-
light) are shown in Figure 3.4. These components include:
■ Pop-up flash. The flash elevates from the top of the camera, theoretically reduc-
ing the chances of red-eye reflections, because the higher light source is less likely
to reflect back from your subjects’ eyes into the camera lens. In practice, the red-
eye effect is still possible (and likely), and can be further minimized with the
D7000’s red-eye reduction lamp (which flashes before the exposure, causing the
subjects’ pupils to contract, and the after-shot red-eye elimination offered in the
Retouch menu. (Your image editor may also have anti-red-eye tools.) Of course,
the best strategy is to use an external speedlight that mounts on the accessory shoe
on top of the camera (and thus is even higher) or a flash that is off-camera entirely.
■ Flash pop-up/Flash mode/Flash compensation button. This button releases the
built-in flash so it can flip up and start the charging process. If you decide you do
not want to use the flash, you can turn it off by pressing the flash head back down.
This button is held down while spinning the main command dial (to choose flash
mode) or sub-command dial (to add or subtract exposure using flash compensa-
tion). I’ll explain how to use the various flash modes (red-eye reduction, front/rear
curtain sync, and slow sync) in Chapter 12, along with some tips for adjusting flash
exposure.
Chapter 3 ■ Nikon D7000 Roadmap 53