


Introducing Subject-Tracking
The useful Subject-tracking autofocus feature is one of those features that can be con-
fusing at first, but once you get the hang of it, it’s remarkably easy to use. Face-priority,
in comparison, is almost intuitive to learn. Here’s the quick introduction you need to
Subject-tracking.
■ Ready, aim… When you’ve activated Subject-tracking, a white border appears in
the center of the frame. Use that border to “aim” the camera until the subject you
want to focus on and track is located within the border.
■ …Focus. When you’ve pinpointed your subject, press the OK button to activate
the D7000’s Contrast Detection autofocus feature. The focus frame will turn yel-
low and the camera will emit a beep (unless you’ve disabled the beep within the
Setup menu) when locked in.
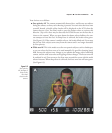
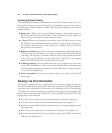
■ Reframe as desired. Once the focus frame has turned yellow, it seemingly takes on
a life of its own, and will “follow” your subject around on the LCD as you reframe
your image. (See Figure 6.5.) (In other words, the subject being tracked doesn’t have
to be in the center of the frame for the actual photo.) Best of all, if your subject
moves, the D7000 will follow it and keep focus as required.
■ Tracking continues. The only glitches that may pop up might occur if your sub-
ject is small and difficult to track, or is too close in tonal value to its background,
or if the subject approaches the camera or recedes sufficiently to change its relative
size on the LCD significantly.
■ Grab a new subject. If you want to refocus or grab a new subject, press the OK
button again.
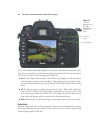
Viewing Live View Information
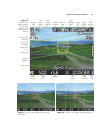
Once you’ve activated Live View, a display like the one shown in Figure 6.6 appears.
Not all of the information appears all the time. For example, the Time Remaining indi-
cator shows only when there are 30 seconds or less remaining for Live View shooting.
The indicators overlaid on the image can be displayed or suppressed by pressing the Info
button (that’s to the lower right of the LCD). As you press the button, the LCD cycles
among these screen variations:
■ Live View screen overlaid with shooting information, as shown in Figure 6.6.
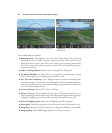
■ Live View screen overlaid with only minimal information. (See Figure 6.7.)
■ Live View screen overlaid with basic information, plus a 16-segment alignment grid.
(See Figure 6.8.)
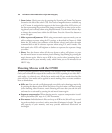
■ Live View screen overlaid with a virtual horizon leveling aid. (See Figure 6.9.)
■ Live View shooting information screen with 16:9 aspect ratio of HD movie format
indicated. (See Figure 6.10.)
David Busch’s Nikon D7000 Guide to Digital SLR Photography160