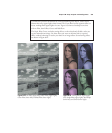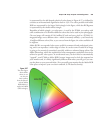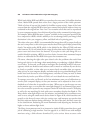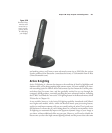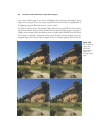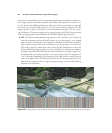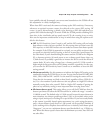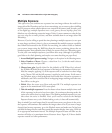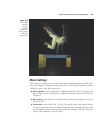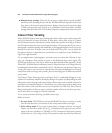
sample images shown have been half-toned and rendered to the printed page, the dif-
ferences may be fairly subtle. For that reason, I’m not illustrating the effects of the Auto
setting (which varies, of course, depending on the scene) and Extra High, which is dif-
ficult to distinguish from High under normal circumstances. Look at the amount of
detail in the overhanging rock in the upper-right area of each version.
For best results, use your D7000’s Matrix metering mode, so the Active D-Lighting fea-
ture can work with a full range of exposure information from multiple points in the
image. Active D-Lighting works its magic by subtly underexposing your image so that
details in the highlights (which would normally be overexposed and become featureless
white pixels) are not lost. At the same time, it adjusts the values of pixels located in mid-
tone and shadow areas so they don’t become too dark because of the underexposure.
Highlight tones will be preserved, while shadows will eventually be allowed to go dark
more readily. Bright beach or snow scenes, especially those with few shadows (think
high noon, when the shadows are smaller) can benefit from using Active D-Lighting.
It’s important to always keep in mind that Active D-Lighting not only adjusts the con-
trast automatically of your image (that’s why you can’t adjust the brightness/contrast of
a Picture Control when Active D-Lighting is turned on), it modifies exposure for both
existing light and flash as well, as I’ve noted. Exposure for both is reduced from about
1/3 stop (at the Low setting) to as much as 1 full stop less at the Extra High setting.
Chapter 8 ■ Setup: Playback and Shooting Menus 263
Tip
In Manual exposure mode, Active D-Lighting does not adjust the exposure of your
image; it simply shifts the center (zero) point of the analog exposure indicator in the
viewfinder/LCD.
Nikon gives you a lot of flexibility in using Active D-Lighting. You can choose the set-
ting yourself, or let the camera vary the amount of tweaking by using Active D-Lighting
Bracketing, which I explained in the general bracketing discussion in Chapter 4. You’ll
find this is a useful feature, if used with caution.
Long Exp. NR
Visual noise is that awful graininess caused by long exposures and high ISO settings,
and which shows up as multicolored specks in images. This setting helps you manage
the kind of noise caused by lengthy exposure times. In some ways, noise is like the exces-
sive grain found in some high-speed photographic films. However, while photographic
grain is sometimes used as a special effect, it’s rarely desirable in a digital photograph.
There are easier ways to add texture to your photos.


