6-29
Cisco IOS Software Configuration Guide for Cisco Aironet Access Points
OL-30644-01
Chapter 6 Configuring Radio Settings
Enabling and Disabling Public Secure Packet Forwarding
Enabling and Disabling Public Secure Packet Forwarding
Public Secure Packet Forwarding (PSPF) prevents client devices associated to an access point from
inadvertently sharing files or communicating with other client devices associated to the access point. It
provides Internet access to client devices without providing other capabilities of a LAN. This feature is
useful for public wireless networks like those installed in airports or on college campuses.
Note To prevent communication between clients associated to different access points, you must set up
protected ports on the switch to which the wireless devices are connected. See the “Configuring
Protected Ports” section on page 6-30 for instructions on setting up protected ports.
To enable and disable PSPF using CLI commands on the wireless device, you use bridge groups. You
can find a detailed explanation of bridge groups and instructions for implementing them in this
document:
• Cisco IOS Bridging and IBM Networking Configuration Guide, Release 12.2. Click this link to
browse to the Configuring Transparent Bridging chapter:
http://www.cisco.com/univercd/cc/td/doc/product/software/ios122/122cgcr/fibm_c/bcfpart1/bcftb.
htm
You can also enable and disable PSPF using the web-browser interface. The PSPF setting is on the Radio
Settings pages.
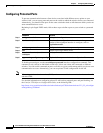
PSPF is disabled by default. Beginning in privileged EXEC mode, follow these steps to enable PSPF:
Use the no form of the command to disable PSPF.
Command Purpose
Step 1
configure terminal Enter global configuration mode.
Step 2
interface dot11radio {0 | 1slot/port} Enter interface configuration mode for the radio interface. The
2.4-GHz radio is radio 0, and the 5-GHz radio is radio 1.
The 802.11n 2.4-GHz radio is radio 0
The 802.11n 5-GHz radio is radio 1.
Step 3
bridge-group group port-protected Enable PSPF.
Step 4
end Return to privileged EXEC mode.
Step 5
copy running-config startup-config (Optional) Save your entries in the configuration file.


