


12-20
Cisco IOS Software Configuration Guide for Cisco Aironet Access Points
OL-30644-01
Chapter 12 Configuring WDS, Fast Secure Roaming, Radio Management, and Wireless Intrusion Detection
Configuring Fast Secure Roaming
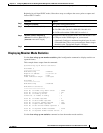
CLI Configuration Example
This example shows the CLI commands that are equivalent to the steps listed in the “Configuring Access
Points to Support Fast Secure Roaming” section on page 12-18:
AP# configure terminal
AP(config)# dot11 ssid NewSSID
AP(config-ssid)# authentication open eap eap_methods
AP(config-ssid)# authentication key-management wpa version 2 cckm
AP(config-ssid)# exit
AP(config)# interface dot11radio0
AP(config-if)# encryption mode ciphers aes-ccm
AP(config-if)# ssid NewSSID
AP(config-if)# exit
AP(config)# end
In this example, the SSID NewSSID is configured to support EAP with CCKM, the AES CCMP cipher
suite is enabled on the 2.4-GHz radio interface, and the SSID NewSSID is enabled on the 2.4-GHz radio
interface.
For complete descriptions of the commands used in this example, consult the Cisco IOS Command
Reference for Cisco Aironet Access Points and Bridges.
Support for 802.11r
Support for 802.11r is provided in Autonomous access points. WGB, Non-root bridge, and repeaters are
not supported in 802.11r. It supports only clients.
These types of roaming are supported over the wireless domain services:
• Fast transition over Distributed System (DS)
• Fast transition over Air
802.11r differs from Cisco Centralized Key Management (CCKM) and Pairwise Master Key Identifier
(PMKID) roaming in these ways:
• Initial authentication occurs before roaming
• Authentication with the target AP over the Air, or through the DS uses the existing access point’s
communication channel
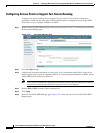
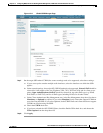
Enabling 802.11r
To enable 802.11r, perform these steps:
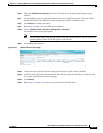
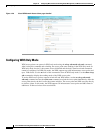
Step 1 Choose Network > Network interface.
Step 2 Click the Settings tab.
Step 3 Choose Radio0-802.11n 2G.Hz or Radio0-802.11n 5G.Hz.
Step 4 Click the enable radio button for 11r Configuration.
Step 5 Click the over-air or over-ds radio button.
Step 6 Enter the reassociation time.
The values range from 20 to 1200.