


13-15
Cisco IOS Software Configuration Guide for Cisco Aironet Access Points
OL-30644-01
Chapter 13 Configuring RADIUS and TACACS+ Servers
Configuring and Enabling RADIUS
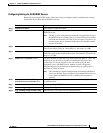
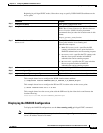
Configuring Settings for All RADIUS Servers
Beginning in privileged EXEC mode, follow these steps to configure global communication settings
between the access point and all RADIUS servers:
Command Purpose
Step 1
configure terminal Enter global configuration mode.
Step 2
radius-server key string Specify the shared secret text string used between the access point and all
RADIUS servers.
Note The key is a text string that must match the encryption key used on
the RADIUS server. Leading spaces are ignored, but spaces within
and at the end of the key are used. If you use spaces in your key, do
not enclose the key in quotation marks unless the quotation marks
are part of the key.
Step 3
radius-server retransmit retries Specify the number of times the access point sends each RADIUS request
to the server before giving up. The default is 3; the range 1 to 1000.
Step 4
radius-server timeout seconds Specify the number of seconds an access point waits for a reply to a
RADIUS request before resending the request. The default is 5 seconds; the
range is 1 to 1000.
Step 5
radius-server deadtime minutes Use this command to cause the Cisco IOS software to mark as “dead” any
RADIUS servers that fail to respond to authentication requests, thus
avoiding the wait for the request to time out before trying the next
configured server. A RADIUS server marked as dead is skipped by
additional requests for the duration of minutes that you specify, up to a
maximum of 1440 (24 hours).
Note This command is required configuration when multiple RADIUS
servers are defined. If not configured, client authentication does not
occur. When one RADIUS server is defined, this command is
optional.
Step 6
radius-server attribute 32
include-in-access-req format %h
Configure the access point to send its system name in the NAS_ID attribute
for authentication.
Step 7
end Return to privileged EXEC mode.
Step 8
show running-config Verify your settings.
Step 9
copy running-config startup-config (Optional) Save your entries in the configuration file.