


4-26
Cisco IOS Software Configuration Guide for Cisco Aironet Access Points
OL-30644-01
Chapter 4 Configuring the Access Point for the First Time
Configuring the 802.1X Supplicant
Configuring the 802.1X Supplicant
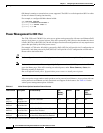
Traditionally, the dot1x authenticator/client relationship has always been a network device and a PC
client respectively, as it was the PC user that had to authenticate to gain access to the network. However,
wireless networks introduce unique challenges to the traditional authenticator/client relationship. First,
access points can be placed in public places, inviting the possibility that they could be unplugged and
their network connection used by an outsider. Second, when a repeater access point is incorporated into
a wireless network, the repeater access point must authenticate to the root access point in the same way
as a client does.
The supplicant is configured in two phases:
• Create and configure a credentials profile
• Apply the credentials to an interface or SSID
You can complete the phases in any order, but they must be completed before the supplicant becomes
operational.
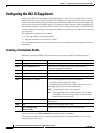
Creating a Credentials Profile
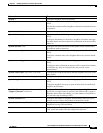
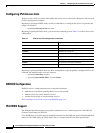
Beginning in privileged EXEC mode, follow these steps to create an 802.1X credentials profile:
Use the no form of the dot1x credentials command to negate a parameter.
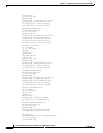
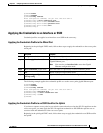
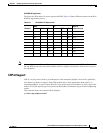
The following example creates a credentials profile named test with the username Cisco and a the
unencrypted password Cisco:
Command Purpose
Step 1
configure terminal Enter global configuration mode.
Step 2
dot1x credentials profile Creates a dot1x credentials profile and enters the dot1x
credentials configuration submode.
Step 3
anonymous-id description (Optional)—Enter the anonymous identity to be used.
Step 4
description description (Optional)—Enter a description for the credentials profile
Step 5
username username Enter the authentication user id.
Step 6
password {0 | 7 | LINE} Enter an unencrypted password for the credentials.
0—An unencrypted password will follow.
7—A hidden password will follow. Hidden passwords are used
when applying a previously saved configuration.
LINE—An unencrypted (clear text) password.
Note Unencrypted and clear text are the same. You can enter a
0 followed by the clear text password, or omit the 0 and
enter the clear text password.
Step 7
pki-trustpoint pki-trustpoint (Optional and only used for EAP-TLS)—Enter the default
pki-trustpoint.
Step 8
end Return to the privileged EXEC mode.
Step 9
copy running config
startup-config
(Optional) Save your entries in the configuration file.