


7-11
Cisco IP Solution Center L2VPN and Carrier Ethernet User Guide, 6.0
OL-21636-01
Chapter 7 Creating an L2VPN Policy
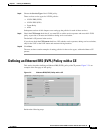
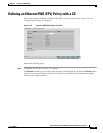
Defining an Ethernet ERS (EVPL) Policy without a CE
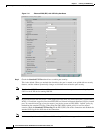
Note The Standard UNI Port attribute will be unavailable within service requests based on this policy if the
UNI is on an N-PE device running IOS XR.
Step 4 Enter an Interface Format as the slot number/port number for the PE interface (for example, 1/0
indicates that the interface is located at slot 1, port 0).
This is especially useful to specify here if you know that the link will always go through a particular
interface’s slot/port location on all or most of the network devices in the service.
Step 5 Choose an Encapsulation type.
The choices are:
• DOT1Q
• DEFAULT
If DEFAULT is the CE encapsulation type, ISC shows another field for the UNI port type.
Note If the Interface Type is ANY, ISC will not ask for an Encapsulation type in the policy.
Step 6 Check the UNI Shutdown check box if you want to leave the UNI port shut during service activation,
for example, when the service provider wants to deploy a service in the network but wants to activate it
at a later time.
Step 7 Check the Keep Alive check box to configure keepalives on the UNI port.
By default, this check box is unchecked, which causes the command no keepalive to be provisioned on
the UNI port. This prevents a CPE from sending keepalive packets to the U-PE, for security purposes.
This attribute is editable to support modification on a per-service request basis.
Step 8 Check the ANY check box to display all interface types as choices for the UNI interface (when creating
service requests based on this policy).
This check box is checked by default.
Step 9 Check the UNI check box to display all interfaces defined as type UNI as choices for the UNI interface
(when creating service requests based on this policy).
This check box is checked by default.
Step 10 Check the VLAN ID AutoPick check box if you want ISC to choose a VLAN ID. If you do not check
this check box, you will be prompted to provide the VLAN in a Provider VLAN ID field during service
activation.
Step 11 Check the VC ID AutoPick check box if you want ISC to choose a VC ID.
If you do not check this check box, you will be prompted to provide the VC ID in a VC ID field during
service activation.
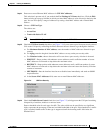
Step 12 Check the Use PseudoWireClass check box to enable the selection of a pseudowire class.
This attribute is only applicable for IOS XR devices. If the check box is checked, an additional attribute,
PseudoWireClass, appears in the GUI. Click the Select button of PseudoWireClass attribute to choose
a pseudowire class previously created in ISC. The pseudowire class name is used for provisioning
pw-class commands on IOS XR devices. See
Creating and Modifying Pseudowire Classes for IOS XR
Devices, page 2-10 for additional information on pseudowire class support for IOS XR devices.