


7-35
Cisco IP Solution Center L2VPN and Carrier Ethernet User Guide, 6.0
OL-21636-01
Chapter 7 Creating an L2VPN Policy
Defining an ATM Policy with a CE
This attribute is used for provisioning the L2VPN group name on IOS XR devices.
Note The choices in the drop-down list are derived from a configurable DCPL property. For
information about how to define the L2VPN Group Name choices available in the drop-down
list, see Defining L2VPN Group Names for IOS XR Devices, page 2-14.
Step 9 Enter an E-Line Name to specify the point-to-point (p2p) E-line name.
This attribute is only applicable for IOS XR devices. If no value is specified for the p2p name, ISC
generates a default name consisting of the names of the two PEs forming the pseudowire, separated by
hyphens (for example, 6503-A----6503-B). If the default name is more than 32 characters, the device
names are truncated.
Step 10 Check the PW Tunnel Selection check box if you want to be able to manually select the Traffic
Engineering (TE) tunnel for the pseudowire connecting point-to-point N-PEs.
This attribute is unchecked by default
Subsequently, when you create a service request based on this policy, you must specify the TE tunnel ID
in a field provided. ISC uses the tunnel information to create and provision a pseudowire class that
describes the pseudowire connection between two N-PEs. This pseudowire class can be shared by more
than one pseudowire, as long as the pseudowires share the same tunnel ID and remote loopback address.
You are responsible to ensure that the tunnel interface and associated ID are configured. During service
request creation when you specify the tunnel ID number, ISC does not check the validity of the value.
That is, ISC does not verify the existence of the tunnel.
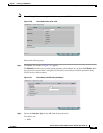
Step 11 Click the Next button, if you want to enable template support for the policy.
The Template Association window appears. In this window, you can enable template support and,
optionally, associate templates and data files with the policy. For instructions about associating
templates with policies and how to use the features in this window, see
Appendix B, “Working with
Templates and Data Files”. When you have completed setting up templates and data files for the policy,
click Finish in the Template Association window to close it and return to the Policy Editor window.
Step 12 Click Finish.