


3-10
Cisco IP Solution Center L2VPN and Carrier Ethernet User Guide, 6.0
OL-21636-01
Chapter 3 Creating a FlexUNI/EVC Ethernet Policy
Setting the FlexUNI Attributes
Note Also, some attributes are supported only on IOS or IOS XR platforms. Attributes apply to both
platforms, unless otherwise noted. All platform-specific attributes are visible in the policy workflow
windows. Later, when a service request is created based on the policy (and specific devices are
associated with the service request), platform-specific attributes are filtered from service request
windows, depending on the device type (IOS or IOS XR).
Step 4 Check the Configure With Bridge Domain check box to determine bridge domain characteristics.
The behavior of the Configure With Bridge-Domain option works in tandem with the choice you selected
in the MPLS Core Connectivity Type option, as follows.
• PSEUDOWIRE as the MPLS Core Connectivity Type. There are two cases:
A. With FlexUNI:
–
If Configure With Bridge Domain is checked, the policy configures pseudowires under SVIs
associated to the bridge domain.
–
If Configure With Bridge Domain is unchecked, the policy will configure pseudowires
directly under the service instance. This conserves the global VLAN.
B. Without FlexUNI:
–
If Configure With Bridge Domain is checked, the policy configures pseudowires as in L2VPN
services (with SVIs).
–
If Configure With Bridge Domain is unchecked, the policy configures pseudowires directly
under subinterfaces.
Only pseudowires can be either configured directly under service instance of the corresponding
FlexUNI-capable interface or under SVIs associated to the bridge domain.
• LOCAL as the MPLS Core Connectivity Type:
–
If Configure With Bridge Domain is checked, the policy allows either point-to-point or
multipoint local connect services.
–
If Configure With Bridge Domain is unchecked, ISC allows only point-to-point local connects
without bridge domain.
• VPLS—Configure With Bridge Domain is checked by default and non-editable.
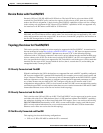
Step 5 Click Next.
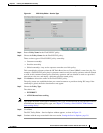
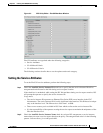
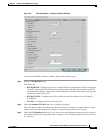
The EVC Policy Editor - FlexUNI Attribute window appears, as shown in Figure 3-3.
Step 6 Continue with the steps contained in the next section, Setting the FlexUNI Attributes, page 3-10.
Setting the FlexUNI Attributes
This section describes how to set the FlexUNI attributes for the FlexUNI/EVC Ethernet policy, as shown
in
Figure 3-3.