


4-10
Cisco IP Solution Center L2VPN and Carrier Ethernet User Guide, 6.0
OL-21636-01
Chapter 4 Managing a FlexUNI/EVC Ethernet Service Request
Setting the Service Request Details
See the appropriate section, depending on which type of link you are setting up:
• Setting Direct Connect Links, page 4-10
• Setting Links with L2 Access Nodes, page 4-20
Note Many of steps for setting up the two link types are the same. The basic workflow for setting up links, as
well as the attributes to be set, are presented in the section
Setting Direct Connect Links, page 4-10. Even
if you are setting up links with L2 access nodes, it will be helpful to refer to the information presented
in that section, as the section on L2 access nodes only covers the unique steps for such links.
Setting Direct Connect Links
Perform the following steps to set up the direct connect links. Most of these steps apply to links with L2
access nodes also.
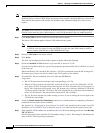
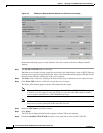
Step 1 Click Add to add a link.
A new numbered row for the link attributes appears.
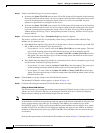
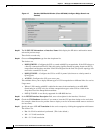
Step 2 Click Select NPE in N-PE column.
The Select PE Device window appears. This window displays the list of currently defined PEs.
a. The Show PEs with drop-down list shows PEs by Provider, PE Region Name, or by Device Name.
b. The Find button allows a search for a specific PE or a refresh of the window.
c. The Rows per page drop-down list allows the user to configure the number of entries displayed on
the screen at one time.
Step 3 In the Select column, choose the PE device name for the link.
Step 4 Click Select.
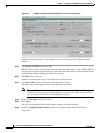
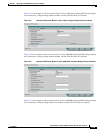
The EVC Service Request Editor window reappears displaying the name of the selected PE in the NPE
column.
Step 5 Choose the UNI interface from the drop-down list in the UNI column.
Note ISC only displays the available interfaces for the service, based on the configuration of the underlying
interfaces, existing service requests that might be using the interface, and the customer associated with
the service request. You can click the Details button to display a pop-up window with information on
the available interfaces, such as interface name, customer name, VPN name, job ID, service request ID,
service request type, translation type, and VLAN ID information.
Note When the UNI is configured on an N-PE device running IOS XR, the Standard UNI Port attribute is not
supported. All the CLIs related to Standard UNI Port and UNI Port Security are ignored in this case.
Step 6 Check the FlexUNI check box to mark the link for configuring service instance for the links.
Note The FlexUNI check box is mentioned at this stage because the setting of the check box alters the
behavior of the link editing function available in the Link Attributes column. This is covered in the next
steps.