


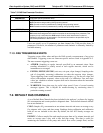


Data Acquisition System (DAS) and APICOM Teledyne API - T100 UV Fluorescence SO2 Analyzer
160
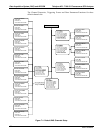
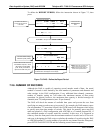
7.2.2. EDITING DAS DATA CHANNELS
Although DAS configuration is most conveniently done through the APICOM remote
control program (refer to Section 6.12.2.8), the following illustrations shows how to edit
DAS channels using the analyzer’s front panel control buttons.
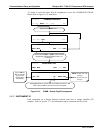
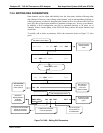
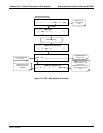
Main Data Acquisition Menu
Edit Data Channel Menu
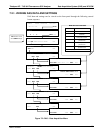
SAMPLE RANGE = 500.000 PPB SO2 =XXX.X
< TST TST > CAL SETUP
SETUP X.X 0) CONC1: ATIMER, 2, 4032, RS-232
PREV NEXT INS DEL EDIT PRNT EXIT
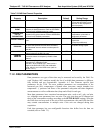
SETUP X.X
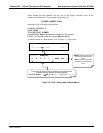
PRIMARY SETUP MENU
CFG DAS RNGE PASS CLK MORE EXIT
SAMPLE ENTER SETUP PASS : 818
8 1 8 ENTR EXIT
EXIT will return to the
previous SAMPLE
display.
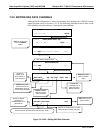
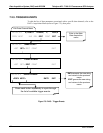
SETUP X.X
DATA ACQUISITION
VIEW
EDIT EXIT
Moves the
display up &
down the list of
Data Channels
Inserts a new Data
Channel into the list
BEFORE the Channel
currently being displayed
Deletes the Data
Channel currently
being displayed
Exports the
configuration of all
data channels to
RS-232 interface.
Exits to the Main
Data Acquisition
Menu
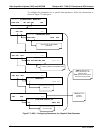
SETUP X.X NAME:CONC1
<SET SET> EDIT PRNT EXIT
Moves the display
between the
PROPERTIES for this
data channel.
Reports the configuration of current
data channels to the RS-232 ports.
Exits returns to the
previous Menu
Allows to edit the channel name, see next menu button.
Figure 7-3: DAS – Editing DAS Data Channels
06807C DCN6650