


Teledyne API - T100 UV Fluorescence SO2 Analyzer Instrument Maintenance
229
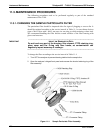
3. Carefully remove the retaining ring, glass window, PTFE O-ring and filter element.
4. Replace the filter element, carefully centering it in the bottom of the holder.
5. Re-install the PTFE O-ring with the notches facing up, the glass cover, then screw
on the hold-down ring and hand-tighten the assembly. Inspect the (visible) seal
between the edge of the glass window and the O-ring to assure proper gas
tightness.
6. Re-start the analyzer.
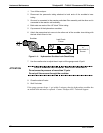
11.3.2. CHANGING THE IZS PERMEATION TUBE
1. Turn off the analyzer, unplug the power cord and remove the cover.
2. Locate the IZS oven in the rear left of the analyzer.
3. Remove the top layer of insulation if necessary.
4. Unscrew the black aluminum cover of the IZS oven (3 screws) using a medium
Phillips-head screw driver. Leave the fittings and tubing connected to the cover.
5. Remove the old permeation tube if necessary and replace it with the new tube.
Ensure that the tube is placed into the larger of two holes and that the open
permeation end of the tube (Teflon) is facing up.
6. Re-attach the cover with three screws and ensure that the sealing O-ring is properly
in place and that the three screws are tightened evenly.
7. Replace the analyzer cover, plug the power cord back in and turn on the analyzer.
8. Carry out an IZS span check to see if the new permeation device works properly.
The permeation rate may need several days to stabilize.
ATTENTION
COULD DAMAGE INSTRUMENT AND VOID WARRANTY
Do not leave instrument turned off for more than 8 hours without removing
the permeation tube. Do not ship the instrument without removing the
permeation tube. The tube continues to emit gas, even at room
temperature and will contaminate the entire instrument.
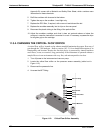
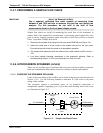
11.3.3. CHANGING THE EXTERNAL ZERO AIR SCRUBBER
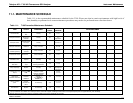
The chemicals in the external scrubber need to be replaced periodically according to
Table 11-1 or as needed. This procedure can be carried out wh
ile the instrument is
running. Ensure that the analyzer is not in either the ZERO or SPAN calibration modes.
1. Locate the scrubber on the outside rear panel.
2. Remove the old scrubber by disconnecting the 1/4” plastic tubing from the particle
filter using 9/16” and 1/2" wrenches.
3. Remove the particle filter from the cartridge using 9/16” wrenches.
4. Unscrew the top of the scrubber canister and discard charcoal contents. Ensure to
abide by local laws for discarding these chemicals. The rebuild kit (listed in
06807C DCN6650