


Troubleshooting & Service Teledyne API - T100 UV Fluorescence SO2 Analyzer
266
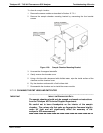
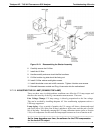
11. Reattach the lens / filter housing to the sample chamber.
12. Reattach the sample chamber to the PMT housing.
13. Reinstall the sensor module into the T100.
14. Close the instrument.
15. Turn the T100 on and let it warm up for 60 minutes.
16. Perform a leak check (refer to Section 11.3.6).
17.
Calib
rate the analyzer (refer to Section 9).
12.7.2.4. REPLACING THE UV FILTER/LENS
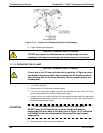
IMPORTANT
IMPACT ON READINGS OR DATA
Be careful not to leave thumbprints on the interior of the sample chamber.
The various oils that make up fingerprints fluoresce brightly under UV
light and will significantly affect the accuracy of the analyzer’s SO
2
measurement).
CAUTION - GENERAL SAFETY HAZARD
Do not look at the UV lamp while the unit is operating. UV light can cause
eye damage. Always use safety glasses made from UV blocking material
when working with the UV Lamp Assembly. (Generic plastic glasses are
not adequate).
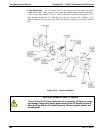
To replace the UV filter lens:
1. Turn off the instrument’s power and remove the power cord from the instrument.
2. Unplug J4 connector from the motherboard to allow tool access.
3. Alternatively, remove the sensor module as described in Section 12.7.2.1.
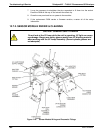
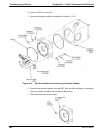
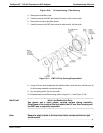
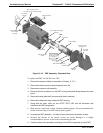
4. Remove
4 screws from the shutter cover (refer to Figure 12-13) and remove the
cove
r.
5. Remove 4 screws from the UV filter retainer.
06807C DCN6650