


Teledyne API - T100 UV Fluorescence SO2 Analyzer Troubleshooting & Service
271
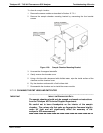
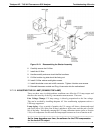
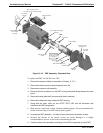
6. Insert the new UV lamp into the bracket.
7. Tighten the two UV lamp bracket screws, but leave the brass thumb screw un-
tightened.
8. Connect the new UV lamp to the power supply.
9. Turn the instrument on and perform the UV adjustment procedure as defined in
section 12.7.2.5.
10.
Finge
r tighten the thumbscrew.
CAUTION - GENERAL SAFETY HAZARD
DO NOT over tighten the thumbscrew, as over-tightening can cause
breakage to the lamp and consequently release mercury into the area.
11. Perform a lamp calibration procedure (refer to Section 5.9.6) and a zero point and
span point calibration (refer to Section 9).
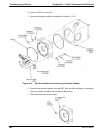
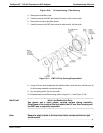
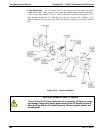
12.7.2.7. REPLACING THE PMT, HVPS OR TEC
The PMT should last for the lifetime of the analyzer. However, in some cases, the high
voltage power supply (HVPS) or the thermo-electric cooler (TEC) may fail.
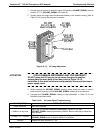
IMPORTANT
When removing the PMT housing end plate cover for the Sensor
Assembly, ensure to replace the 5 desiccant bags inside the housing.
06807C DCN6650