


Troubleshooting & Service Teledyne API - T100 UV Fluorescence SO2 Analyzer
272
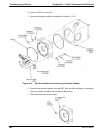
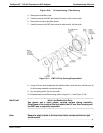
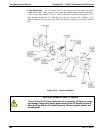
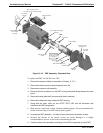
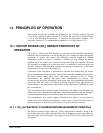
PMT Housing End Plate
This is the entry to the PMT Exchange
PMT Preamp PCA
High voltage Power Supply
(HVPS)
PMT
PMT Cold Block
Connector to PMT
Pre Amp PCA
12V Power
Connector
Cooling Fan
Housing
TEC Driver PCA
PMT Heat Exchange Fins
Li
g
ht from Reaction
Chamber shines
throu
g
h hole in side
of Cold Block
Insulation Gasket
PMT Power Supply
& Aux. Signal
Connector
PMT Output
Connector
Thermo-Electric Cooler
(TEC)
PMT Temperature
Senso
r
O-Test LED
Figure 12-16: PMT Assembly - Exploded View
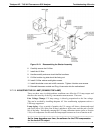
To replace the PMT, the HVPS or the TEC:
1. Remove the sensor module as described in Section 12.7.2.1.
2. Remove the entire sensor module assembly from the.
3. Remove the reaction cell assembly.
4. Remove the two connectors on the PMT housing end plate facing towards the front
panel.
5. Remove the end plate itself (4 screws with plastic washers).
6. Remove the desiccant bags inside the PMT housing.
7. Along with the plate, slide out the OPTIC TEST LED and the thermistor that
measures the PMT temperature.
Both may be coated with a white, thermal conducting paste. Do not contaminate the
inside of the housing or the PMT tube with this grease.
8. Unscrew the PMT assembly. It is held to the cold block by two plastic screws.
Because the threads of the plastic screws are easily damaged it is highly
recommended to use new screws when reassembling the unit.
9. Carefully take out the assembly consisting of the HVPS, the gasket and the PMT.
06807C DCN6650