


DEFINITY Enterprise Communications Server Release 6
Installation and Test for Multi-Carrier Cabinets
555-230-112
Issue 5
May 1998
Install and Wire Telephones and Other Equipment
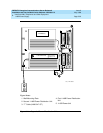
Page 5-481145B Power Supply
5
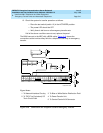
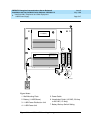
Mount the 1146B Power Distribution Unit
1. Insert and securely tighten the 2 supplied #8-32 x 1/2-inch shoulder
screws into the top holes designated for 1146B Power Distribution Unit on
the bottom plate. Mount the unit on these 2 shoulder screws, using the key
holes on the back of the unit.
2. Secure the unit by inserting the #8-32 x 1 inch screw through the bottom of
the unit (just above the wire clips) into the plate and tighten.
3. Set the battery back-up switch option to the 1-32 (down) position to
provide battery back-up to all outputs.
4. Connect the power distribution unit to the power supply with the power
cable. Refer to the power supply’s right-hand label to locate the output
power connection.
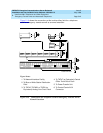
Battery Mounting/Wiring
Three types of back-up batteries are used; the 1148B, the 1149B, and the 1147B.
Table 5-15
provides the rating and PEC code of each battery.
1. Loosely thread two #10-32 x 1/2-inch shoulder screws into the top
designated battery holes on the wall mounting plate.
2. Place the keyhole slots in the battery bracket on these 2 screws. The
battery cord exits from the right of the bracket. Make sure the label on the
battery is visible. Tighten the screws securely.
3. Plug the battery cord into the power supply’s right rear receptacle. The
rear receptacle is indicated on the right label.
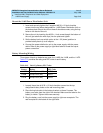
Table 5-15. Back-Up Battery PEC Codes
Battery Rating PEC Code
1148B 2.5 Amp Hour (AH) 24700
1149B 5 Amp Hour (AH) 24701
1147B 8 Amp Hour (AH) 24703