


Adding a WWN Block to a WWNN Pool
A WWN pool can include only WWNNs or WWPNs in the ranges from 20:00:00:00:00:00:00:00 to
20:FF:FF:FF:FF:FF:FF:FF or from 50:00:00:00:00:00:00:00 to 5F:FF:FF:FF:FF:FF:FF:FF. All other
WWN ranges are reserved. To ensure the uniqueness of the Cisco UCS WWNNs and WWPNs in the SAN
fabric, we recommend that you use the following WWN prefix for all blocks in a pool:
20:00:00:25:B5:XX:XX:XX
Important
Procedure
Step 1
In the Navigation pane, click the SAN tab.
Step 2
In the SAN tab, expand SAN > Pools > Organization_Name .
Step 3
Expand the WWNN Pools node.
Step 4
Right-click the WWNN pool to which you want to add a WWN block and select Create WWN Block.
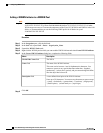
Step 5
In the Create WWN Block page, complete the following fields:
a) In the From field, enter the first WWNN in the pool.
b) In the Size field, enter the number of WWNNs to include in the pool.
c) Click OK.
Deleting a WWN Block from a WWNN Pool
If you delete an address block from a pool, Cisco UCS Manager does not reallocate any addresses in that
block that have been assigned to vNICs or vHBAs. All assigned addresses from a deleted block remain with
the vNIC or vHBA to which they are assigned until one of the following occurs:
• The associated service profiles are deleted.
• The vNIC or vHBA to which the address is assigned is deleted.
• The vNIC or vHBA is assigned to a different pool.
Procedure
Step 1
In the Navigation pane, click the SAN tab.
Step 2
In the SAN tab, expand SAN > Pools > Organization_Name > WWNN Pools > WWNN_Pool_Name .
Step 3
Right-click the WWN block that you want to delete and select Delete.
Step 4
If the Cisco UCS Manager GUI displays a confirmation dialog box, click Yes.
Cisco UCS Manager GUI Configuration Guide, Release 2.0
OL-25712-04 347
Configuring WWNN Pools