


Choose Select (pool default used by default) to use the default WWN pool.•
• Choose one of the options listed under Manual Using OUI and then enter the WWN in the World
Wide Node Name field.
You can specify a WWNN in the range from 20:00:00:00:00:00:00:00 to 20:FF:FF:FF:FF:FF:FF:FF
or from 50:00:00:00:00:00:00:00 to 5F:FF:FF:FF:FF:FF:FF:FF. You can click the here link to verify
that the WWNN you specified is available.
• Choose a WWN pool name from the list to have a WWN assigned from the specified pool. Each
pool name is followed by two numbers in parentheses that show the number of WWNs still available
in the pool and the total number of WWNs in the pool.
b) In the vHBA 0 (Fabric A) area, complete the following fields:
• In the Name field, enter a unique name for the vHBA.
• From the Select VSAN drop-down list, choose the name of the VSAN with which this vHBA should
be associated.
If the VSAN you need is not in the drop-down list, click the Create VSAN link. For more information,
see Creating a Named VSAN, on page 335.
c) Repeat Step 7b in the vHBA 1 (Fabric B) area to create a VSAN for that vHBA.
d) Continue with Step 9.
Step 6
(Optional) If you chose the expert SAN storage option, do the following:
a) From the WWNN Assignment drop-down list, choose one of the following:
• Choose Select (pool default used by default) to use the default WWN pool.
• Choose one of the options listed under Manual Using OUI and then enter the WWN in the World
Wide Node Name field.
You can specify a WWNN in the range from 20:00:00:00:00:00:00:00 to 20:FF:FF:FF:FF:FF:FF:FF
or from 50:00:00:00:00:00:00:00 to 5F:FF:FF:FF:FF:FF:FF:FF. You can click the here link to verify
that the WWNN you specified is available.
• Choose a WWN pool name from the list to have a WWN assigned from the specified pool. Each
pool name is followed by two numbers in parentheses that show the number of WWNs still available
in the pool and the total number of WWNs in the pool.
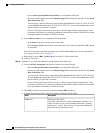
b) Click Add on the icon bar of the table to open the Create vHBA dialog box.
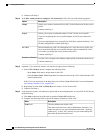
c) Complete the following fields to specify the identity information for the vHBA:
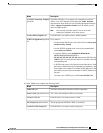
DescriptionName
The name of this vHBA.
This name can be between 1 and 16 alphanumeric characters. You
cannot use spaces or any special characters other than - (hyphen), _
(underscore), : (colon), and . (period), and you cannot change this
name after the object has been saved.
Name field
Cisco UCS Manager GUI Configuration Guide, Release 2.0
494 OL-25712-04
Creating Service Profiles