


60-97
User Guide for Cisco Security Manager 4.4
OL-28826-01
Chapter 60 Router Device Administration
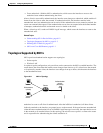
NTP on Cisco IOS Routers
Defining NTP Servers
This procedure describes how to define the NTP servers that the routers users to synchronize time. After
the NTP policy is deployed, the router uses an algorithm (based on factors such as delay, dispersion, and
jitter) to determine which NTP server is the most accurate and synchronizes to that one.
At the global level, you can enable MD5 authentication and specify a source address to use on all NTP
packets sent from the router.
To add an NTP server to the policy, all you need to do is enter its IP address. In addition, you can
optionally define authentication parameters and determine whether a particular server should be
preferred over other NTP servers of similar accuracy.
Related Topics
• NTP on Cisco IOS Routers, page 60-96
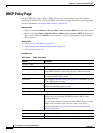
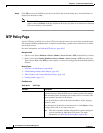
Step 1 Do one of the following:
• (Device view) Select Platform > Device Admin > Server Access > NTP from the Policy selector.
• (Policy view) Select Router Platform > Device Admin > Server Access > NTP from the Policy
Type selector. Select an existing policy or create a new one.
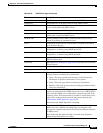
The NTP page is displayed. See Table 60-41 on page 60-98 for a description of the fields on this page.
Step 2 (Optional) In the Source Interface field, enter the name of the interface or interface role whose address
should be used as the source interface for all NTP packets sent from the router, or click Select to select
an interface role from a list or to create a new one. The source interface must have an IP address.
This option is useful when the NTP server cannot reach the address from which the connection
originated (for example, due to a firewall). If you do not enter a value in this field, the address of the
outgoing interface is used.
Note You can override this global setting for individual NTP servers, as described in Step 5.
Step 3 (Optional) Select the Enable NTP Authentication check box to authenticate all associations between
this router and the NTP servers defined in this policy.
Step 4 Click the Add button under the Servers table to display the NTP Server dialog box. From here you can
define an NTP server.
Step 5 Define an NTP server. See Table 60-42 on page 60-100 for a description of the available fields.
Step 6 (Optional) Define authentication parameters for this NTP server.
Note If you modify the value of a previously defined authentication key, the change affects all NTP
servers that share this key.
Note When you define an authentication key in Security Manager, the value 0 is automatically
appended to the end of the CLI command. This value, which represents the default
authentication key encryption type, can be modified using the CLI.
Step 7 Repeat Step 5 and Step 6 to define additional NTP servers.